Tuesday, March 4, 2014

Unity Tutorial: Scrolling Ticker Text

As I work more and more with Unity, I've begun to learn tricks and tools that I'm guessing would probably be useful to others as well. In my most recent game, Bubble Market, I created a scrolling ticker text box at the bottom of the screen to display active events which were effecting the game at any given point in time. This kind of scrolling text is useful as a general UI element, so I made sure to keep the script generic enough to be re-used. It also occurred to me that these sort of tools may be useful to others as well, so I thought I'd write a quick post explaining what I did, how I did it, and providing the script as an example.


Step 1: Scissoring

The first thing you need to create a scrolling ticker text object is a graphical effect known as scissoring.
Scissoring: In computer graphics, the deleting of any parts of an image which fall outside of a window that has been sized and laid over the original image. Also called "clipping."
There are some more advanced ways to create this effect in Unity, but I went with the easiest route: using a separate camera to render the scissored object. If your scene has a lot of scissoring with different areas going on, I'd suggest looking into other methods, but for simple and limited applications, the camera method works just fine.

To apply this technique, first set up your object without scissoring enabled. Make sure it's large enough that it is easily evident whether your scissoring is working or not. For my example, I used a long test string in my ticker text mesh:


Before we set up the camera, you'll need to change the layer this object is set to. In the upper right of the object's inspector window, click the Layers drop-down and choose to create a new layer. Call it something like "ClippedObjects". Set your ticker object to the new layer.

Now, in your scene hierarchy, duplicate your main camera. Call the new camera something like "Clipping Camera". Make sure these two cameras are in exactly the same place in the game world. You'll need to make several important modifications to the cameras:

  • Clear Flags: On the Clipping Camera, change clear flags to "Don't Clear".
  • Culling Mask: On the Clipping Camera, change the Culling Mask to only have ClippedObjects (our new layer) selected. You'll also need to modify the Main Camera's Culling Mask, so that ClippedObjects is NOT selected. This will make our new camera only render this layer, and our old camera ignore it.
  • Viewport Rect: This is the actual rectangle where the clipping will take place. On the Clipping Camera, define it to whatever you like. You should be able to see the camera's bounds in the scene, and the effect in the camera preview and Game panel.
  • Depth: Make sure the depth of the Clipping Camera is higher (more positive) than the depth of the Main Camera. This will ensure the Clipping Camera is drawn AFTER the Main Camera, which is what we want.
If you run the game, your object should now be clipped based on the Viewport Rect you set on your new camera.


Step 2: Scrolling

This was the first part of the effect I was after, a ticker text where the text disappears as it scrolls to the side. Now for the scrolling itself.

The actual scrolling is just a simple change to the object's transform each frame, I won't bore you with that. The interesting bit was figuring out when the object was no longer visible, and figuring out exactly how far to the right to place it so it can start scrolling again.

While I could have simply used the renderer's isVisible property to tell if it was off screen, this wouldn't have been enough for the second part of the scrolling: moving it back to the other side of the screen. Instead, I decided to use the renderer's bound property, which measures the bounds of the object in world coordinates. I set up minimum and maximum x limits for the visible range of the object, which correspond to the viewport I set up in Step 1. I saved these limits as data members in the script.

With this set up, I can easily tell when the object has moved off screen to the left by comparing the renderer bounds of the object to my saved x limit:


ResetScroller() is a method which moves the scrolling text to the right, just off screen and ready to start scrolling again. We determine where to place this text in the same way that we determined when it was off screen: using our scissor limits and the object's renderer bounds:

This first calculates the width of the object in world space, then edits the object's x coordinate to be the maximum plus half it's width. This is because my text object is centre aligned - however, if your text is aligned left, you won't need this step.

If you create a simple script and apply the method described above, you should see something like this:


Further Modifications

What I described above will get a basic scrolling text functionality in place. However, what if you want to change the text? What if something tries to change the text mid-scroll? Currently, the text will change right there, somewhat ruining the effect. For my scroller, I designed a queue system which accepts new messages and switches to the next message while the text is off screen, or repeats the last message a specified number of times (or infinitely). I'm sure there's a lot more functionality you could add to the system even beyond that.

If you'd like to see the finished product, I've made the script available as a gist. Feel free to use it directly or as a model for your own creations.

What interest text systems have you added to your Unity programs? Please share if you implement the ticker text system in your game - I'd love to see this tutorial being put to good use.

Thanks for reading! 


Sunday, February 9, 2014

Global Game Jam - MasqueRace


I love game jams. A game jam is a crazy creative mess, a high pressure font of ideas and collaboration. From constraints are the greatest concepts born, and fast prototyping allows outlandish, ridiculous things to be tried that you might never be willing to waste time with normally. Game jam games have even been released later as full games, such as Bossa Studios' Surgeon Simulator. And Double Fine have started opening their internal game jam, Amnesia Fortnight, to the public, selling the products and allowing the public to vote on games they like.

My Global Game Jam team Tiny Tales, plus some other shmucks

Recently, I participated in the Global Game Jam with a group of friends and fellow students of Abertay University. The jam theme was a sentence: "We do not see things as they are. We see things as we are." Our brainstorming session based on this topic resulted in tons of crazy ideas, such as "you are a fly", lots of ideas about perception, and even a murder mystery visual novel.


Team brainstorming session!

In the end we decided on a game about masks which change the character's perception of reality and alter the world around you. The game is a multi-player rhythm-based runner for the OUYA, dubbed MasqueRace, similar to Bit Trip Runner. The players changed masks to allow them to pass different obstacles. If an obstacle isn't correctly passed, the player slows down, meaning they cover less distance. The player who covers the most distance by the end of the song is the winner.


Level select screen, with three complete levels and
drop-in/drop-out for all four players.

This game was an absolute blast to make. I had never worked on a multi-player game before, nor one designed as a console experience. It was a challenge, but since it was local multi-player it wasn't technically too difficult. We did encounter a lot of unexpected problems - in particular, the scrolling background was a huge pain, being much more difficult to implement than we expected. However, we learned a lot, and we're all really proud of the result.

In-game, with four players, two with different masks active.

The best part about this game jam, for me, was the end. Seeing a large group of people gathered around our game, four players at a time, up on a huge TV, was an amazing experience. In the past all of my games have been single player only, and this one, while very simple, seems to be the most fun to play so far.

A crowd tries out the game.

We are currently polishing the game up in preparation for a game jam showcase on the 19th. If you happen to be in Dundee, stop by Abertay's Bar One and try out the game that evening! After that, we are considering releasing the game on the OUYA store on a donation payment plan.

J Quest

I'd like to start a new section at the end of my blogs - "J Quest", a challenge to my readers, and an invitation to conversation about the topic discussed in the blog.

This time, I'm inviting you to share your experiences with game jams in the past. Have you participated? If so, what lessons did you learn in doing so? If not, why not, and do you plan to in the future? What advice would those who have tried game jams have to give to those who haven't made the plunge yet?

My next post will introduce my next project, and my plans for my personal studio in the coming months. Look forward to it!

Friday, January 24, 2014

How To: Bitbucket meets Github GUI

If you've spent any time at all in software or game development, you have at least heard of "version control", probably accompanied by admonishments that you should be using it (you should). However, it's not always easy for new folks to decipher exactly WHY you need version control, what it is, and what the best way to go about using it might be. I've talked about this subject before, even going so far as to write a "newbies guide" to it. However, that was before it became possible to use Github's excellent Github GUI with the wondrous value of free private repositories on Bitbucket.

To save you from having to refer to two guides at once, I'm going to re-hash a lot of what I said in my original Newbies Guide to Version Control. The main difference here is that the old guide is written to work with the repositories at Github.com. The problem with that is that you can only use public repositories for free at Github, while at their competitor Bitbucket you can make private repositories for free. This is obviously a desirable feature for game development.

Enough talk, on to the guide!

What Is Version Control?

Version control is a way of tracking the changes you make to a project over time. Using a version control system such as Git, you can see a list of all previous versions of your project, and roll back to a previous version with ease. You can also "fork" your project to work on a separate instance of it, then merge it back together. Version control also works well in group projects because you can see exactly who made what changes, which can be very helpful when you need to ask someone about a piece of code. Additionally, version control systems usually support a remote repository - a place where the code is hosted online, which allows a group to share their work easily, and can also serve as an extra back up should local storage fail.

In this guide, the version control system we'll be looking at is called Git. The online repository hosting site we'll be using is called Bitbucket. Both are completely free to use, and with the desktop Github GUI, are quite easy.

Why Do I Need Version Control?

Version control is vital to developers, and anyone who likes to keep multiple versions of their work. Have you ever made a major change to something, only to find you really liked it better before? Did the most recent update from the programmers completely break the game, with no way restore it to how it was before? With version control, it's very simple to roll back changes or to integrate stuff you deleted in a previous version. Many people, before version control, did this by keeping multiple copies of their project locally on their computer - but this quickly becomes a disk space hog and also can be quite confusing. Version control systems like Git don't keep full copies of the project but instead keep track of differences, in a long line of differences going back to the original commit. This means that while the same information is saved, you don't have nearly as much space taken up by useless older versions of the project.

Version control with a remote repository has the added bonus of keeping you safe from hard drive failure, as it serves as a backup. Additionally, it is ideally suited to group work, giving a place to share work and a way to track who has done what. Bitbucket has many other features that help with group work, including issue tracking where tasks can be set and assigned, and a wiki where members can contribute and read documentation.

Installing the Github GUI

To get started, we'll need the Github GUI (the front end program we'll be using) and a Bitbucket account.
  1. Download the Github GUI from...
    Windows: http://windows.github.com/
    Mac: http://mac.github.com/
  2. Create a free Bitbucket account: https://bitbucket.org/account/signup/
You are now set up and ready to create your first repository! I'll guide you through this by making a sample repository with you.

Creating Your First Repository

Now that we have everything installed, it's time to create our first repository! We'll do this using the Bitbucket website. Once you log in, you'll be taken to your dashboard. In the upper right corner is a button "Create Repository". Click it.


Enter a name for your repository. I'll use "Tutorial" as the name for mine. When you name your projects in the future, make sure they are descriptive names so you and your colleagues can easily find the repository you're looking for.

Enter a description. This is also important as it's the first thing strangers or team mates might look at to learn more about your project. For my example I'll describe it as: "A simple repository for learning how to use github."

The rest of the options can be left at default, though you can check to add a wiki and issue tracker if you like (you can always add these later too!). When everything is filled out to your satisfaction, click "Create Repo".


You'll be greeted with a page full options for managing your repo. What we need to get started is the address for your git repo. On the overview, click "Getting Started" and "I'm starting from scratch".


This will take you to a page showing some terminal commands to use git to clone this repo and get started. Sounds complicated? That's okay, we're not gonna do that! Instead, open up the Github GUI you downloaded earlier. When you first open it, you'll be asked to do a one-time setup. You can skip entering a GitHub account (you don't need one to use this application with Bitbucket) but you do need to put in your name and email as these will be used to identify you in your commits. You can always change this stuff later in the application's settings.

When you're done, you'll see something like the picture below.


Now, in this screenshot I have three existing local repositories. Your right hand side of the window will be significantly more empty. You also probably don't have a GitHub account logged in like I do. That's fine - you won't need one.

The next step may seem a little odd, but it is the simplest way to get your bitbucket repo working with Github. First, move your Github window off to one side of the screen, then bring your bitbucket website window up on the other side of the screen. Still on that same page we got to above with the terminal commands? Good. The last command has an address in it. That's your repo's address. Highlight it, then drag it across to Github's window.


GitHub will create an empty repository for you, since the address points to an empty one. If you already had stuff up there when you dragged it across, it would download it and show you the repository history here.

You will also be asked for your Bitbucket username and password. Once you type them in, GitHub can remember them so you don't have to do it again.

Congratulations! You have created your repository on your local computer and on your remote repo on Bitbucket. Now you just need to fill it with stuff.

Making Commits and Syncing

You have a repository now, but it's empty. We'll create a simple text document to demonstrate making commits and syncing.

A commit is when you tell the program to take a snapshot of your project - somewhat like saving a new version. Generally you want to commit after each self-contained change is made. Fix a bug? Make a commit. Add a feature? Make a commit. Error on the side of smaller changes as opposed to massive amounts of differences between commits.

Syncing is when you upload your changes to the remote repository, or download changes from it - when you sync up your local and remote repositories. Always do this before and after you work on the project - before to make sure you have the most current code when you start, and after to make sure your work is uploaded and the remote repo is kept current. This is especially important when working in a group.

Now, on to how to do all that!

You can right-click the repository to get a context menu with several import options. 
  • Open: This opens the repository in the GitHub GUI. We'll use this to make commits in a minute.
  • Clone and Clone to...: Use this option to clone a repository from Bitbucket which you don't yet have a local copy for.
  • View on github: This is only useful if your repo is on GitHub, which ours is not.
  • Open in explorer: This opens a file browser to the repository's local location on your PC. We'll use this in a minute.
  • Open a shell here: For advanced users only. This allows you to use powershell to muck about with the repo at this location.
  • Stop tracking this repo: This will remove the repo from your list, useful for cleaning up if you no longer want to update a repo. You can always clone it again later.
Real quickly, lets add some useful default files to the repo. These are ".gitignore" and ".gitattributes". These files help keep your repo clean and ignore large, unnecessary binary files for common programs. Open your repository by clicking the right arrow on the far right side of it. Once the repository is open, click the cog icon in the upper right and select "Repository Settings...". Then just click the blue text to add the default .gitignore and .gitattributes files. Finally, check update at the bottom of the window. You'll see your repo with a few new entries - we'll cover what all this means in a minute.

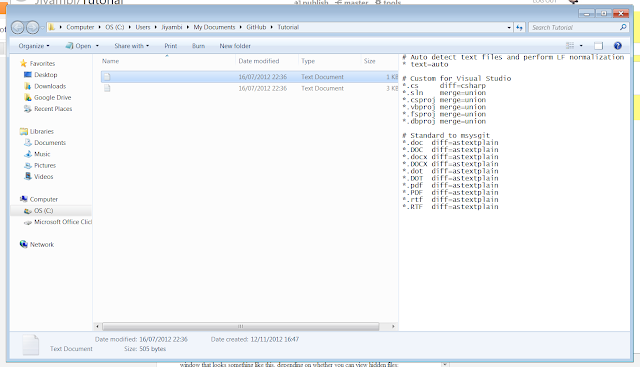
Next up, we're going to add a readme.txt for the repo. Doing this allows people browsing your repo to easily see what your project is all about. So lets get to that! Right-click the repo and choose "open in explorer". You should get a window that looks something like this, depending on whether you can view hidden files:

What are those funny invisible files? Those are .gitattributes and .gitignore we added earlier.

Let's create a simple readme.txt to start us off. Create a new .txt document (you can right click the folder and select New -> Text Document). Name it readme.txt and put some text inside. Typically you want the readme to be a nice summary of your project, and you may want to include author names, copyright or license information, version details, and things like that.

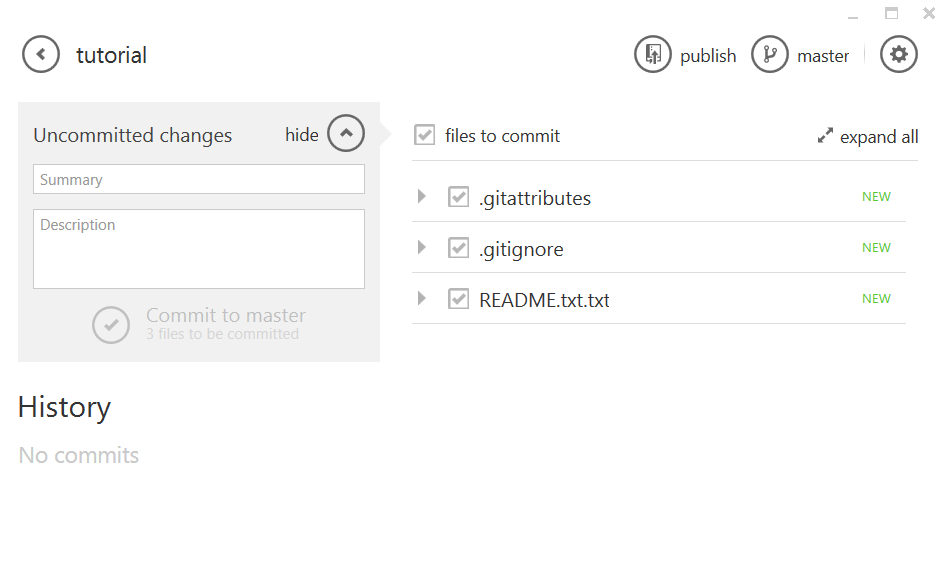
Click the arrow next to the Tutorial repository listing (you can also right-click and select "open") to open the repository. You should see something like this:


This is the repository view. The files are listed on the right, with the history of the repository on the lower left, unsynced changed above that, and the current commit message at the top left. Right now we have only a few files, and no history or unsynced changes. You'll notice that there is a little "new" message next to our three files - the program is telling us that these files were not previously part of the repository. On the left of those files, you also see a check box. Generally you want to leave this checked - this tells the program that we want these changes to be part of our commit.

Lets go ahead and make our first commit. Type in a commit message. Often with the first commit you just want something like "Initial commit" - but always try to make the message as descriptive but succinct as possible (a few words only). You can put more details in the extended description as needed. When you're done, hit "Commit to master"!

You'll notice the window has changed, it will now look something like this:


On the left, we now have an entry in "unsynced commits" - the commit you just made. If you select it, the left side will now show the changes that were made during that commit. This is very handy since you can go back and look at when certain changes were made. You can roll back to a previous commit using this interface by clicking one of the two buttons at the top - either "revert commit" to reverse the changes made by the commit, or "roll back to this commit", which reverts back to a state just after this commit was made. Both would be silly at the moment, but can be very useful for long-term projects.

Let's go ahead and upload our change to the remote repository on Bitbucket. This is very easy to do! Just click "publish" at the top of the window - normally this will say "sync" but since this is our very first commit for this repo, it will read "publish". It will take a moment to upload, then the "publish" command will change to "in sync", meaning your local repository matches the remote one. Always check for this when preparing to work, especially when working on a group project. You'll also notice your commit has moved from "unsynced commits" down to "history" - meaning it is now part of the Bitbucket repository history.

We've made our first commit and published our first repo to the remote repository! Let's make a quick change so you can see how the differences look. Open up the file browser again and edit the readme.txt in some way - add a few more lines of text (maybe an author section) and modify some of the existing text. Save your changes, and head back to the GitHub GUI window. You should see your changes represented on the left (you may need to click "show" on uncommitted changes at the top right):


As you can see, the changes are represented as lines added or lines deleted. If you change a line, it counts as deleting the old line and adding a new one. Git conveniently tracks line numbers as well, something most programmers should be familiar with.
Go ahead and commit your change and sync it with the remote repo.

You now have created a repository, added files to it, published it, made changes, and submitted the changes! That in itself is pretty awesome, but that's not all git offers. Lets go to the website to see what other cool things we can do.

Further Features to Learn

This guide barely scratches the surface of what awesome and useful tools are available through version control, GitHub, and Bitbucket. First of all, you have your Bitbucket website, where you can browse and even edit your source right there in the web browser. There is a very useful wiki and issue tracker, great for documentation, task management, and bug reporting and management. You can create team pages to manage multiple people using the same repos. You can set up downloadable builds of your game to give to your testers.

In addition to the features on the Bitbucket website, git and GitHub's GUI have a ton of other, powerful features I haven't covered here, such as branching, forking, merging, reverts and roll-backs, and the ignore and attributes files. Git is a popular system so there is a lot of documentation out there, but hopefully what I've provided here is useful by itself and a good jumping-off point for future learning.

If you have any questions, feel free to leave a comment here and I'll do my best to answer!


Sunday, January 19, 2014

Dissertation Complete - So Long, Uni!

At long last, after NINE YEARS of university (over half for a degree I'm not using), I am finally done! Friday, I submitted my dissertation. Assuming marking goes well, I am now a "Master" of Computer Game Technology. Now to move on to bigger and better things!

I may have been a little excited when it came back from the printer....

What does that mean for me, and for the blog? Well, firstly, I'll now be working full time at Ninja Kiwi Europe, maker of the mobile versions of the extremely popular Bloons games. I've been part time there since September, and it's an awesome place. I'm happy to be able to work there full time now.

However, that doesn't mean I'm abandoning my personal projects. In fact, I'm starting off my new professional life with a bang at the Global Game Jam, with an awesome team of Abertay students and recent grads. Most of us worked together at the TIGA Game Hack, and we're excited to work together again. It should be a ton of fun, and I'll definitely be updating here and on my Twitter (@Jiyambi) as we go.

After the game jam, I'll be focusing on making games with my partner Roy Stevens. Our first project is a mobile game called Bubble Market, made as part of the Abertay Game Development Society. Bubble Market will be programmed in February, with an alpha ready by the end of March and beta at the end of April. I'll be calling for testers during those times, so keep an eye out. Expect to see it on Google Play and possibly other Android app stores in May!

Also in February we will be pitching six game ideas internally. The chosen idea will be moved into pre-production, and work will begin on it as Bubble Market is completed. For this game, we are hoping to find an artist or two to help us out, but Roy is also taking some time to focus on his artwork so either way, we should have a nice set of skills for development.

As for the blog, I will continue using this as a space for development updates and reflections. I also plan to write a few how-to posts. The first of these will be posted shortly, and will cover using Github for Windows (the desktop program) with Bitbucket (the git repository). This has been requested by some of the Abertay Game Development Society folks and I think it could be a big help to student game development teams.

When I look back at when I started this blog, compared to where I am today, I see an amazing journey. It's invigorating to see the progress I've made, and so much more exciting to think about where I'll go from here. Look forward to it!

Tuesday, December 10, 2013

Tenebrous - Open For Testing


The time has come! As I mentioned previously, I need people to play the game I created for my dissertation, Tenebrous, in order to gather data for said dissertation. If you'd like to help out, please read the following instructions carefully, and you have my sincerest thanks!

NOTE: Unfortunately, the game is currently only available on Windows.

UPDATE: People have been asking about the deadline. I have a demo Thursday 19th of December, so I would like to receive some responses before then so I can show off some results, but anytime before 31st December would be grand.

How To Help

  1. Download the game from https://drive.google.com/file/d/0B7n0P-XMWZ_Yd1Y5Z0ZDdUdSM2c (~50 MB). Unzip the folder. Keep track of where you put this folder, you will launch the game from here and this is where you will find the logs you need to send me.
  2. Read the How To Play section below before playing - there is no in-game tutorial or even a list of controls. Rough prototypes for the win!
  3. Play through the game as much as you like.
  4. Create a zip file of all your logs, located in the logs folder (in the folder you downloaded above). Send this zip file with your logs to sarah.ann.herzog@gmail.com.
  5. Go to https://docs.google.com/forms/d/1QEBzITmxkK-TjlmRfrK5cCYGDZ8D5v6EZdsrCQYYxAo/viewform to take a very short survey about your experience with the game. Remember to input your name when requested if you would like to be included in the Tenebrous credits when it is released.
  6. Feel proud that you contributed to research for the good of games!

IMPORTANT: I need TWO THINGS from you:

  1. Email me your logs from the logs folder inside the game folder after you play
  2. Complete the online survey (results are sent automatically). 

Please don't forget either of those!

How To Play

Goal of the Game: You are lost and alone in a hostile, darkness-covered forest. You must reach the safety of a nearby holy house (follow the purple arrow!) before your magical light runs out. Be careful, as the creatures of the darkness are attracted to light and will drain yours if they touch you! Luckily, you are a holy warrior and have a few tricks up your sleeve, but don't be foolhardy: These monsters cannot be defeated by the likes of you, only delayed and avoided.

Controls:
  • Movement - WASD / Arrow Keys.
  • Sneak - H. Use this to dim your light, preventing enemies from noticing you.
  • Boost - J. Use some of your light to continuously boost your speed. Great for escaping enemies.
  • Distract - K. Drop a gem filled with some of your light behind you. Enemies will target it instead of you, allowing you to escape. You can also pick it back up if you need to, but it will lose light over time so you won't get 100% of your light back.
  • Flare - L. Hold in this button to charge up and release a bright flare, stunning nearby enemies but using a large chunk of your light.
Terrain:

 There are four types of terrain:

  • Clear land. This is denoted by a neutral gray colour and has no effect on movement or light.
  • Forest. This is black, and cannot be moved through.
  • Swamp. This is light blue, and slows the player.
  • Miasma. This is purple, and drains your light.


Enemies:

Pulsar - A simple enemy which stays in once place and sends out a pulse of darkness, pulling in creatures of light and damaging them.


Bomb - This enemy is slow moving, but can be deadly if it should catch you. It will explode when in bright light, leaving a patch of miasma that will damage anything inside it.


Hopper - A dangerous foe who moves in quick hops, but must take time to change direction and can be outmanoeuvred.

Power-Ups:


Light Gem - A helpful gem filled with holy power, boosting your magical light. Will attract monsters.

Thank You For Participating!

If you have any questions, feel free to contact me at sarah.ann.herzog@gmail.com. I really appreciate your help, I wouldn't be able to complete my dissertation without you!
Update: What Am I Logging?

I realized I should let you all know what information I am logging:
  • Game time
  • Game inputs (movement and abilities)
  • Picking up light gems
  • Being injured by enemies
  • Player's light value over time
  • Player's position relative to the start and to the objective over time
  • Active enemies and enemies targeting the player
  • Active light gems

Wednesday, December 4, 2013

Tenebrous - Calling All Gamers!


As you may know, I'm currently working on a game for my dissertation. This post will tell you a bit about the game, what I hope to learn from it, and how you can help!

Game Overview


The game is called Tenebrous, and is a top-down action/horror game in which you must reach a safe haven before running out of magical light. The darkness itself is your enemy - your light drains naturally over time, and is drained much more quickly if you come into contact with monsters or miasma, a purple substance created by said monsters. To aid you in your quest, you have four light-based powers:

  • Sneak - dim your light and move slowly to sneak past monsters (they only target you if they are within your light range). Be cautious - moving more slowly means your light is drained more to get the same distance!
  • Boost - expel some of your light behind you to move forward at a brisk pace.
  • Flare - charge up and then release a brilliant flare, stunning nearby enemies and revealing the surrounding terrain briefly. Uses a large amount of light to activate.
  • Distract - drop a gem filled with your light. Enemies will prioritise this gem and ignore you while it is there. However, it will slowly lose the light that was given to it, eventually disappearing. The good news is, you can pick it back up to regain some of you light if you are quick!
Armed with these abilities, you must navigate a twisting, procedurally generated forest filled with swampy ground that slows you and malevolent miasma which drains your light as you pass through. You will be attacked by three different types of monster: The pulsar, a stationary creature which sends out a pulse and pulls you in towards it, dealing damage to you as you touch it; The bomb, moving slowly towards you and exploding as it gets close; and the hopper, a fast moving creature that must stop to re-orient itself before continuing pursuit.

Research Goal


What is the point of all this? Why is it worthy of a dissertation? The project and research subject was inspired by Left for Dead and Warframe - both games with procedurally generated gameplay experiences, in which enemies are spawned in based on the current intensity of gameplay. This is a very interesting idea because it means that player experiences can be crafted to match the quality of pacing achieved in hand-scripted levels, but in endless, procedural levels. 

Rather than attempting to recreate exactly what Valve and Digital Extremes had already done in Left for Dead and Warframe, I decided to view this concept through the lens of my previous career in engineering. The intensity the player experiences via the game's pacing can be thought of as an output from a controller, and the input is the threats the game creates for the player to interact with. The controller's job is to judge what quantity of threat to provide to achieve a target intensity.

To that end, I have created a PID (proportional integral differential) controller which keeps track of the intensity the player is experiencing (based on their actions, movements, damage taken, enemies targeting them, etc), the target intensity (this would be controlled and tuned by a designer, a very simple model has been chosen for this project), and from these generates a target threat output and spawns enemies to meet that threat output.

TLDR: The project spawns enemies based on the amount of action the player is experiencing, with the goal of making a well-paced game procedurally.

How You Can Help


In order to measure how well this project succeeded, I need people to play the game and send me their logs! There will also be a short survey once you complete the game. The gameplay is not designed for long play - I expect there to be roughly 5 minutes of gameplay followed by 5 minutes of survey. Combined with downloading the game and uploading your log, I expect it should only take around 15 minutes of your time total. I'd really appreciate the help, and when the game is released, you can have your name in the credits!

If you are interested in testing, please send me an email at sarah.ann.herzog@gmail.com. I'll be contacting everyone on my list on Monday 9th of October with details on how to download the game and how to send me your logs.

Thank you so much for your help!

Tuesday, October 15, 2013

Exploring Scotland - Along the East Coast

In my last few posts, I've been telling the tale of my travels through Scotland with my parents. In my first post, we toured my university's city and current home, Dundee. Next, we headed north to Aberdeen, Inverness, and Loch Ness. This time, we'll be exploring the area in between - the little town of Kirriemuir and the castles Glamis and Dunnottar.

Kirriemuir

When I was young, my favourite story was Peter Pan. For whatever reason, I was fascinated by this fun-loving boy who refused to grow up, and to this day have a soft spot in my heart for the story. It's no surprise then that I found Kirriemuir an intriguing little town, as it was the birthplace of the author of Peter Pan. Not surprisingly, the town has lots of Peter Pan themed sights, including a statue of Peter Pan and a run-down looking "Hook's Hotel".

Mom and Dad pose in front of the Peter Pan statue, near the run-down Hook's Hotel

While the Peter Pan themed landmarks were fun, the main reason for our visit to Kirriemuir (or Kirrie as it is often called by locals) was for family. Not only does Roy's mother work in the little town as a minister, Roy's brother and his new little family recently moved there. We had a great time visiting and playing some jams together - check out little Sebastian on the bongos!

Dinner at Alan and Zara's house was full of music and laughter.

Glamis Castle

View of Glamis from the front approach
Glamis was the first castle I saw in Scotland - Roy's mother Linda took me there shortly after we started dating. It was also the first castle we took my parents too (before we went up to Loch Ness). Compared to Urquhart and, as you will soon see, Dunnottar, Glamis is a much newer and more modern castle. It is, in fact, still used occasionally by the Queen Mother, who grew up there in her youth. Thankfully, it was a beautiful day and the castle looked absolutely stunning. We had a wonderful tour guide who showed us around and was very knowledgeable.

The family poses in front of the castle
We weren't allowed any pictures inside Glamis, but it was mostly extravagantly furnished rooms that, while interesting, weren't really what I have in mind when I think of castles - I guess it's just the D&D player in me that expects dank and ancient ruins. One neat feature of the tour was that several rooms were set up as they were centuries before the Queen Mother was in residence at the castle, so we got to see several different time periods as we moved through the castle. 

We also had an absolutely lovely time exploring the castle gardens, and found some truly beautiful areas there - as well as a few surprises from back home, including a douglas fir and other trees specially transplanted from the Pacific Northwest.
 
The castle gardens were actually my favourite part of my trip to Glamis.

Dunnottar Castle

Dunnottar is my favourite castle so far in Scotland. Dunnottar's claim to fame is that the Honours of Scotland were once smuggled out of this castle during a siege, and were safely hidden for many years thereafter. (We'll revisit the Honours in the next post, about Edinburgh and the castle where they now reside). Dunnottar is a cliffside castle, on the coast a short distance from the town of Stonehaven.

On the approach from the road, the castle cuts an imposing silhouette, fading in and out of the ocean mist like something out of a fantasy novel. Previously I had been too intimidated by the extremely steep climb down the cliff and back up to the castle, but this time around we were going to brave it to see inside.

First, we climbed down to the beach to explore. Turns out Scotland beaches are pretty similar to Oregon beaches - rocky, cold, and not much to see. But it was still fun!

I'm not the most fit of people, and many times on the way cursed myself for attempting the trek, thought of going back, and generally felt awful about the situation. However, that all faded away the moment I got inside and saw the mossy, water-worn, mist-dampened stones of this ancient ruin. I felt I had stepped into a story, or a particularly good session of D&D. A grin plastered to my face, I charged all around the grounds, taking pictures of everything I saw (and making Roy pose in as many silly ways as he could think of).

I took a ton of pictures on this visit, so I'll leave you with just my favourites.


When we first reached the castle grounds, it was shrouded in mist


 The light shining into the ruined underground halls was ethereal

Later, the sun came out, and we got to see the castle in the beautiful, clear air.

We found the remains of an ancient forge. Roy demonstrates it's use.


The family poses together with Dunnottar in the background.


Afterwards, we went to a small country farm cafe for smoothies and lunch

That's about it for Dunnottar Castle. Next time I'll talk about our last two big locations - Broughty Ferry and Edinburgh!