Friday, December 21, 2012

Creating an AI Controller - Bezier Curves and More

I've talked a bit here about my coursework for my DirectX module. I also have a project for my AI class, which I've been working on over the past few days.

The Assignment

The assignment is simple: Create a fuzzy logic controller for a racing game that will control the NPC cars. The suggested implementation is extremely simplistic - the road is represented by a line, the car by some simple symbol or sprite, and the line moving left or right represents curves.

Inputs and Outputs

The inputs to the controller are twofold. First, the position of the line relative to the car, negative being on the left, positive on the right, in pixels. Second, the relative velocity of the line with respect to the car, in pixels per second.

The output will be the suggested acceleration for the car in order to bring it closer to the line, in pixels per second per second.

Membership Functions

I've decided to use five membership functions for each input (far right, right, center, left, and far left). For output, I've decided on nine membership functions (extreme right, large right, right, slight right, center, and so on).

For the shapes and locations of these functions, I've created an HTML5 interface which allows several points for the shapes to be adjusted via sliders and text boxes. Internally, all shapes are represented as trapezoids with four points: the left base point, left peak point, right peak point, and right base point. Additionally, each trapezoid has two "curviness" settings, left and right. The idea is that with these six settings, we can create any and all of the common membership function shapes (triangle, trapezoid, curve) and any combination of them, and they are all represented identically within the code. This will allow me to tweak the membership functions easily to tune the controller.

A screenshot of the control panel for modifying the membership functions

This took a bit of doing, but I'm happy to say I've completed it and the interface is really nice.  The most difficult part was the representation of the "curviness" for the sides of the trapezoid. I wanted to keep this simple from a user standpoint, but I wasn't sure what equation to use for the curves and how to constrain the system. After some discussion with an old colleague from my chemical engineering days, Robert Coolman, I determined that a cubic spline function would be appropriate. The native capabilities of the HTML5 canvas led me to investigate the bezier curve. It turned out this was just what I needed - the bezier curve is a spline using one or two control points. Using the demo located on sitepoint.com's excelent tutorial, I was able to visualize exactly what I would use to represent the "curviness". The two control points are located on the same y coordinate as the endpoints. The x coordinate for the control points can range anywhere in between the two x coordinates, but to keep symmetry must be an equal distance from their respective end point. This distance, then, represented the "curviness". I specify some value from 0 to 10, which is then scaled to the space between the two x coordinates.

The next problem, once this was determined, was actually applying the Bezier curve's equation to find a corresponding y coordinate. This is done internally by the HTML5 canvas to draw the curve, but to use the controller I would need to be able to find it on my own. Unfortunately this would require finding the solution to a cubic equation. After some perusal of various articles including Wikipedia's Bezier Curve and Cubic Equation articles, I was able to write a function to find the real cubic root of an equation given the coefficients, and was able to determine those coefficients from the Bezier curve equation and a bit of algebra.

Rules

Given these inputs and outputs, I created a fuzzy associative map in order to ensure each situation was covered under a rule. I also plan to represent the ruleset internally in a similar fashion, to make it possible to procedurally step through the rules, and to even make it possible to tune the rules as needed.

Fuzzy Associative map covering all possible set combinations

Defuzzification

For defuzzification, I plan to keep things simple and use the Center of Maximums method. This should provide fairly accurate results as long as membership functions are mostly symmetrical - for non-symmetrical membership functions, error will be introduced due to the method not accounting for portions of the function below the maximum plateau being uneven. If I have sufficient time I may look into the center of gravity method, but for now it is beyond the scope of my plans.

The Game

The game itself will be coded using the HTML5 Canvas and JavaScript. A line will represent the centre of the road, and a sprite will represent the car. The camera will be centred on the car, but both the car and line can move freely about the game world.

There will be both a defined track (movement of the line defined using pattern movement techniques) and a user controlled track (movement of the line controlled  by the user as described in the assignment sheet).

Second AI Controller: Genetic Algorithms

The assignment also requires a second AI method to be used in addition to Fuzzy Logic. I am interested in genetic algorithms, so I plan to use a genetic algorithm to tune the fuzzy logic controller. I will then compare this result to my manually tuned controller.

Wish List

In addition to the basic features outlined above, I have several advanced features I'd like to add:
  • After a track is run, the program should automatically display a summary of the performance of the AI for that course, and several useful graphs and statistics including standard deviation.
  • The ability to save membership function settings to file both before and after a track is run would be useful.
  • Similarly, the ability to load these membership functions from file would also be useful.
  • For the genetic algorithm tuning, it would be great to watch the membership function values change in real time.
  • A real-time animation of fuzzy logic operations while AI is running the track could provide insight into AI actions and assist in debugging.
Completion of some of these features could take the project beyond a simple exercise and make it a useful teaching tool for demonstrating fuzzy logic in the future.

Wednesday, December 12, 2012

Creating a DirectX Scene - This is not the bug you're looking for

I've been working on my DirectX scene over the past few days, primarily cleaning up my code and making it more object oriented. I created an array of models and render them via a loop now. Unfortunately this revealed what I thought at first was a bug in my code. Let me demonstrate:


At first glance, it appears that the light on each of these models is coming from a slightly different location. However, the same lighting direction is passed to all models. I thought perhaps the way I was transforming the world matrix was somehow affecting my lighting direction as well - I tried different things, pored through the code, and generally fumed ineffectually at the problem for several hours before finally writing to my instructor. Thankfully, he was able to quickly resolve my problem, if in a rather unexpected way.

It turns out the bug was not in the code but in my brain's perception of the scene. Because we have so little information to work with in this scene, and we're trying to interpret a 2D image as a 3D image, our brains actually come to the wrong conclusion. If there were more varied objects in the scene providing perspective, or if we were able to move around the scene, we'd reallize the truth - we aren't seeing all of the spheres from the same angle. The light IS hitting them all from the exact same direction, but our camera is not SEEING them all from the same direction.

The give-away is the texture. If you look closely you'll see the light is hitting the textures all in the exact same way on each sphere. The textures appear rotated differently on each sphere from our perspective, too, but they are all facing the same way, it's simply that we are seeing each from a slightly different angle. In fact, the only part of the light that is actually changing due to where we are in respect to the sphere is the specular highlight, because it's position depends on the camera location in addition to the lighting direction.

My mind was a bit boggled when I understood what my instructor was saying, and I admit I raged a bit at having wasted several hours on what was in fact not a bug. But it is pretty interesting to see first hand how our minds, when presented with a limited amount of information, can easily interpret things into a completely incorrect conclusion.

Tuesday, December 4, 2012

Creating a DirectX Scene - The Beginning

Remember back when I said I was working on a scene in DirectX? Yeah, that didn't stop being a thing. I've been spending most of my time with it so far simply getting used to the system, but I'm finally ready to start getting my hands dirty with the code.


This week, I've added a second model into the scene and learned to move, rotate, and scale the models. This will be essential if I want to have a believable space scene later on. I also unintentionally caused one sphere to orbit another due to a mis-ordering of transformations on my second model. I haven't decided if I want to try to use this method for orbiting planets in my scene or if I will use a less "cheaty" way of doing orbits.

My next goal is to clean up my code and remove hard-coded elements. I will create a uniform method for rendering a model, create an to hold my models rather than having a variable for each one, and work on how to render them using this array or a more object-oriented solution. After that, I'll be working on camera movement via keyboard input. And from there I should be in a good situation to start adding the more complex elements of the scene.

I'll be documenting my problems and discoveries along the way here on the blog, as I'll need all of that for the report due along with the program for my module.

Wednesday, November 28, 2012

Games Can Change The World


I recently re-watched Jane McGonigal's TED talk, "Gaming can make a better world". If you haven't seen it, you really should pop over and watch it - even if you don't buy in to everything she talks about, it's still quite inspiring. In fact, I'll just embed it here for you:


In the video, Jane talks about framing real world problems in game terms to take advantage of gamer habits. I think this is a wonderful idea, and actually fits in with some industry predictions I have been reading about. Dan Greenawalt, a Game Director at Turn 10 Studios, said in an interview with IGN that in 2020 he predicts  that games will become so integrated with reality that daily life will become the meta-game. You'll get achievements for going on a date, or have daily quests to clean the house. While this may seem silly, as a gamer we are convinced to do absolutely dull, drudgerous tasks over and over again through games all the time - and we enjoy it. If we can bring that into the real world, to solve big or small problems, why not?

What really captured my imagination is Jane's most recent project (as of the video) - using games in an education program. My friends and I have been talking about how, in a game, when you complete the game it's a demonstration of mastery of that game. The whole game is an exam. Can we structure learning of traditional subjects in this way, so that completing a class is it's own exam? It seems to me that anything, ANYTHING could be taught in terms of a game - and be the better for it. With things that are fun and engaging, our mind soaks up facts like a sponge. I remember the names of the cities and countries I've explored in World of Warcraft far better than the places I studied in my geography class, for example.

I'm not sure I agree with everything Jane says in the video, but I do agree that we can use games to improve the world. There's a lot of potential there, and with game-playing becoming more and more of a mainstream activity, I think we would be foolish not to try to tap into it.

Tuesday, November 27, 2012

Women In Gaming Industry - Lowest In Decade


Edge-online ran an article today placing the total percentage of women in the gaming industry at 6% - a shockingly low number that has actually fallen from 12% in 2006. This statistic has left many experts scratching their heads - at a time when record numbers of women are playing games, how is it their participation in the industry has actually fallen over recent years?

At this point it's not a matter of industry not hiring. And it's not a matter of girls not being in the gaming space, though the core gamers are still primarily men. It is true that the core gaming scene is still less than inviting to women, being full of sexist behavior. Still, I would expect to see higher numbers than this. Part of it may be that women are not willing to put themselves through the same terrible working conditions that men are putting up with in crunch - that men seem to have more raw passion for games than women. This is probably an extension of the core gamer demographic, again.

It would be interesting to see a comparison of the statistics for women in computer science, and women in each subgenre of gaming - for example, are there more women in mobile/facebook games? Are women in the gaming industry primarily artists, designers, or programmers? Unfortunately the original survey data at www.creativeskillset.org is rather thick to get through - it would be great to see this presented as an info-graphic or chart.

Being a woman coming into this industry, I'm a little concerned at the backward movement. While I'm not worried about blatant sexism, being treated as an outsider in teams is something I have heard about, and something that the industry gals over at GeekGirlCon have mentioned in the past. It's unfortunate that women in gaming communities and in the industry must prove themselves to be "real" in the eyes of their male colleagues - heaven forbid she might be a "fake" gamer-girl. That said, I personally haven't experienced any awkwardness in working with my classmates so far - I guess I come off as a fairly authentic gamer! Being assertive and honest seems to be a great policy in getting around as a female game programmer so far.

Tuesday, November 20, 2012

Creating a DirectX Scene - Planning


My coursework for my DirectX module this term calls for me to create a small scene rendered using DirectX. I struggled for quite a while with ideas for what sort of scene to create, until today settling on the idea of a space scene. In today's blog, I'll cover my plans for this scene and what features will need to be added. I'll give updates in the future as I work on the scene.

The Basics

For the basics, I plan to have a small solar system with planets rotating a sun at different speeds. The sun will serve as a light source. The viewer will be able to move around the scene and view it from different angles and locations. 

In class, we've already accomplished several of the basics:
  • Spherical model loaded in
  • Texture loaded for model
  • Directional, ambient, and specular lighting coded
  • Input processing added
In addition to these, I will need to add several features to create my minimal scene:
  • Multiple objects with models and textures loaded in at once
  • Movement of objects
  • Input processing to catch movement keys
  • Movement of camera (player)
  • Light comes from a point within the scene (direction vector depending on location relative to sun light source) rather than an external point (single direction vector the same for all objects)
With these features, I will have what I consider a minimal functioning scene. Once this is finished, I can build on it to make a more complex and interesting piece of coursework.

The Fancy Stuff

From the basics described above, I will continually add features to create a more interesting scene. These might include some of the following:
  • Sky-box - a background of stars and interesting space scenery
  • Asteroid field - more interesting models than just spheres
  • Space station - similarly, more complex model, perhaps with animation (rotating wheel)
  • Comet with ice trail particle effects
  • Space cloud particle effects
  • Fire effects around sun
  • Spaceship UI overlay
  • Lens flare - possibly an actual realistic reason for lens flare, seen through a spaceship wind-shield while looking at the sun!
  • Bloom - similarly, from looking at the sun

Blogging About It

I'll be keeping a development journal here on the blog for both this and my other coursework. This will help me stay on track with my coursework, assist in me in my final post-mortems of my work process, and I hope be an interesting insight into my work process. 

Monday, November 19, 2012

Games Are Serious Business

Are games a mature enough medium to tackle serious subjects? Gamesindustry International's Rob Fahey doesn't think so, but says we should keep trying anyway, in his article from earlier this year.

It's articles like this that continue to inspire me, and push me ever toward the indie scene. Innovation and tackling risky and difficult subjects seldom happens in the AAA market. It's simply too risky, and big businesses are beholden to their investors. But independent developers have so much freedom to make truly interesting games that challenge what the industry is capable of.

My good friend Merrit Kopas is a hobbyist developer in Seattle, whose free to play web-based games have garnered some notoriety in indie circles for tackling complex and vitally important topics. His game LIM deals with the idea of "blending in" - whatever that might mean for the player. Without any words, with only squares for characters, LIM communicates emotions and violence in a visceral, powerful way that can be felt far more deeply than any cutting edge graphics ever portrayed.

Other games which display this level of maturity include Loneliness, another browser based game. Dear Esther is often hailed as a masterpiece of beautiful storytelling, though personally I found it rather boring and pretentious. Games do not have to be all about "fun" anymore - these games show us this.

The existence of these games tell me that Rob Fahey was wrong - if you know where to look, games are already tackling difficult issues and handling them well. They are portraying powerful and deep emotions, and eliciting emotional responses from players. These may not ever become as fully integrated into mainstream gaming as pure entertainment games are, but even now AAA titles are tackling issues like this and receiving praise for it - take Spec Ops the Line for example, with it's startlingly dark and complex take on the typical modern military shooter. There's not just hope at the end of the tunnel - we are already here.

In an art course I took back in the USA, we were taught that art is a creation made with the purpose of eliciting an emotion from the person experiencing the art. If that person feels the desired emotion, the art was successful. Given this definition, games as art are not a thing of the future. They are all around us. If they can pull our heartstrings, make us laugh, cry, and truly care about the results of our actions in the game, then they have succeeded as works of art. There will always be games that aim only to entertain, and that's great. But games as art, games as mediums for difficult topics and platforms for discussion of important issues - yes, we are mature enough for this. More please!

Sunday, November 18, 2012

Wii U With Indie Friendly Features

A lovely article on destructoid today reported that the Wii U will not only allow developers to set whatever price they choose for their games - they will also not charge for patches to the game. This is huge, as Microsoft's exorbitant $40,000 charge to patch a game with their XBox Live service prevents many indie devs from posting games, or fixing buggy games after launch.

While I love the PC as a medium, it's really great to see console manufacturers supporting indie developers with services like this. We need the big AAA devs for the fantastic, blockbuster quality games, epic graphics, and lengthy stories. But my heart will always be with the rugged, risky indies, and I think that it is in the indie arena where the envelope is pushed and the industry is grown. It's very heartening that indies have more and more options going forward, and gives me hope that I may be able to be part of a successful indie studio someday.

Saturday, November 17, 2012

Where is J?

I am sick, and probably will be for another few days. Blame the damp, cold Scottish air. I'll be back to my regular posting schedule next week.

Monday, November 12, 2012

Newbie Guide to Version Control


After my last post about Github's awesome new desktop tool, and because I'm encouraging my friends and team members to use version control in their projects, I thought I'd write a guide to version control for the complete newbie. I'll be focusing on Git and Github because they are now the most accessible forms of version control, in my opinion.

What Is Version Control?

Version control is a way of tracking the changes you make to a project over time. Using a version control system such as Git, you can see a list of all previous versions of your project, and roll back to a previous version with ease. You can also "fork" your project to work on a separate instance of it, then merge it back together. Version control also works well in group projects because you can see exactly who made what changes, which can be very helpful when you need to ask someone about a piece of code. Additionally, version control systems usually support a remote repository - a place where the code is hosted online, which allows a group to share their work easily.

In this guide, the version control system we'll be looking at is called Git. The online repository hosting site we'll be using is called Github. Both are completely free to use, and with the recent desktop application from Github, are quite easy.

Why Do I Need Version Control?

Version control is vital to programmers. It can also be useful to any non-programmer who likes to keep multiple versions of their work. Have you ever made a major change to something, only to find you really liked it better before? With version control, it's very simple to roll back changes or to integrate stuff you deleted in a previous version. Many people, before version control, did this by keeping multiple copies of their project locally on their computer - but this quickly becomes a disk space hog and also can be quite confusing. Version control systems like git don't keep full copies of the project but instead keep track of differences, in a long line of differences going back to the original commit. This means that while the same information is saved, you don't have nearly as much space taken up by useless older versions of the project.

Version control with a remote repository has the added bonus of keeping you safe from hard drive failure, as it serves as a backup. Additionally, it is ideally suited to group work, giving a place to share work and a way to track who has done what. Github has many other features that help with group work, including issue tracking where tasks can be set and assigned, and a wiki where members can contribute and read documentation.

Installing Git and Github

To get started, we'll need both git (the program for the actual version control under the hood) and the GitHub GUI (the front end program we'll be using).
  1. Go to http://git-scm.com/downloads
  2. Choose your operating system
  3. Go through the Git installation, using the default settings.
  4. Download the Github GUI from...
    Windows: http://windows.github.com/
    Mac: http://mac.github.com/
  5. Create a free Github account: https://github.com/signup/free
    You can also pay for an account, which allows private repositories - however, I suggest trying out the free version first as it's very easy to upgrade later if you choose to do so.
You are now set up and ready to create your first repository! I'll guide you through this by making a sample repository with you.

Creating Your First Repository

Now that we have everything installed, it's time to create our first repository!
  1. Open the newly installed GitHub.
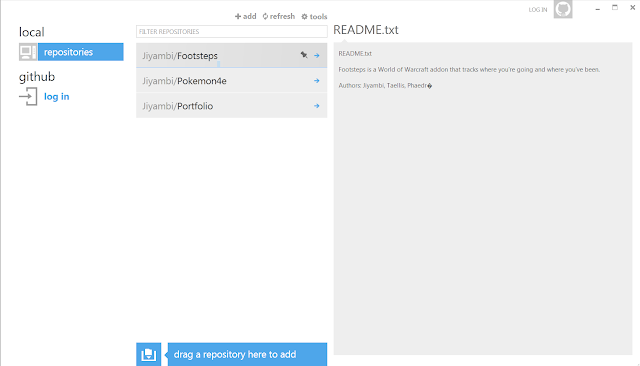
  2. You should see something like the following:


    You'll notice I have a few local repositories already, but you won't yet.
  3. On the lefthand menu under github, select log in and log into your new account.
  4. You won't have any repositories yet - that's okay, we'll create on now! At the top of the screen you'll see a little plus sign next to the word "add". Click that. You should see a screen like this:

  5. Enter a name for your repository. I'll use "Tutorial" as the name for mine. When you name your projects in the future, make sure they are descriptive names so you and your collegues can easily find the repository you're looking for.
  6. Enter a description. This is also important as it's the first thing strangers or team mates might look at to learn more about your project. For my example I'll describe it as: "A simple repository for learning how to use github."
  7. You can change the location for the repository if you want to. I like to leave mine in the default folder, which is in the My Documents folder and a subfolder called GitHub. Where you keep yours is up to you as long as you can find it easily.
  8. Leave "push to github" selected. If you did want to only use the GitHub GUI to use git locally, you can uncheck this box. However, unless you are trying to keep your code secret, it's really better to use the remote repository since you get free project backups that way.
  9. For now, leave "keep this code private" unchecked. This means anyone will be able to see your code - in the future, you can get a paid subscription to github to create/convert to private repositories, or if you are feeling adventurous you can try other services such as Bitbucket which allow free private repos. For now, though, we'll just use a free public repository.
  10. Finally, click "Create" at the bottom!

You've created your first repository! It will appear locally on your computer and also on github.com. Next we'll need to fill it up with something.

Making Commits and Syncing

You have a repository now, but it's empty. We'll create a simple text document to demonstrate making commits and syncing.

A commit is when you tell the program to take a snapshot of your project - somewhat like saving a new version. Generally you want to commit after each self-contained change is made. Fix a bug? Make a commit. Add a feature? Make a commit. Error on the side of smaller changes as opposed to massive amounts of differences between commits.

Syncing is when you upload your changes to the remote repository, or download changes from it - when you sync up your local and remote repositories. Always do this before and after you work on the project - before to make sure you have the most current code when you start, and after to make sure your work is uploaded and the remote repo is kept current. This is especially important when working in a group.

Now, on to how to do all that!
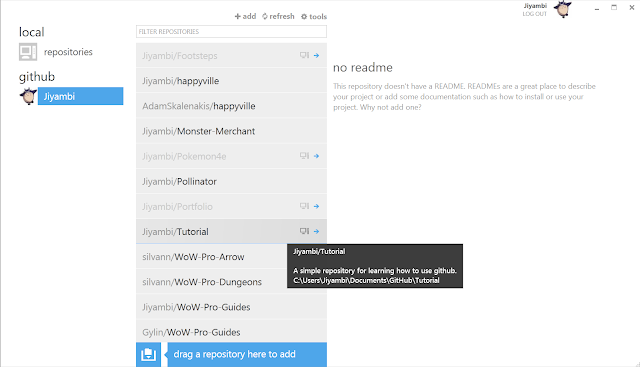
  1. Your new repository will now show up both in the local and github sections of the GitHub GUI. See my picture below for an example - I have a lot of extra repositories, but we'll focus on the one titled "Tutorial".

  2. You can right-click the repository to get a context menu with several import options. 
    • Open: This opens the repository in the GitHub GUI. We'll use this to make commits in a minute.
    • Clone and Clone to...: Use this option to clone a repository from github.com which you don't yet have a local copy for.
    • View on github: This will open a web browser to this repository's page on github.com. Useful if you want to use some of github's other features such as the wiki, issue tracker, or more advanced viewing systems and graphs.
    • Open in explorer: This opens a file browser to the repository's local location on your PC. We'll use this in a minute.
    • Open a shell here: For advanced users only. This allows you to use powershell to muck about with the repo at this location.
    • Stop tracking this repo: This will remove the repo from your list, generally you'll want to avoid this.
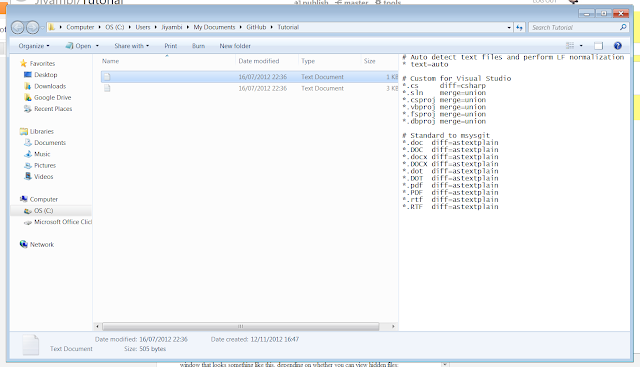
  3. You'll probably also notice that the text on the right-hand side is nagging you about adding a readme.txt for the repo. Doing this allows people browsing github to easily see what your project is all about. So lets get to that! Right-click the repo and choose "open in explorer". You should get a window that looks something like this, depending on whether you can view hidden files:

  4. What are those funny invisible files? Those are .gitattributes and .gitignore. They let you set up a few settings for the repository. However, they are a bit beyond the scope of this guide, so you can safely ignore them for now.
  5. Let's create a simple readme.txt to start us off. Create a new .txt document (you can right click the folder and select New -> Text Document). Name it readme.txt and put some text inside. Typically you want the readme to be a nice summary of your project, and you may want to include author names, copyright or license information, version details, and things like that.
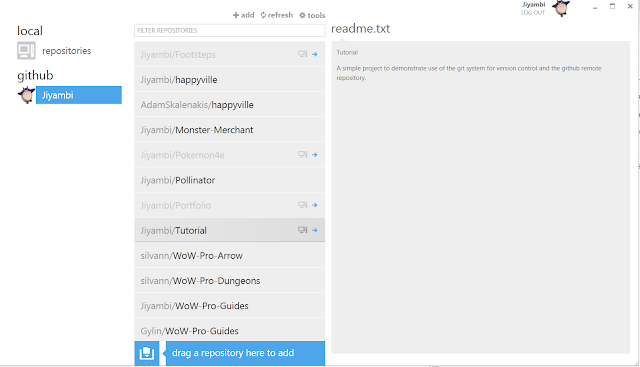
  6. With your readme created in your repository's folder, click back over to your GitHub GUI window. You'll notice it's no longer nagging you about the readme and instead is displaying the text you typed in!


    Click the arrow next to the Tutorial repository listing (you can also right-click and select "open") to open the repository. You should see something like this:

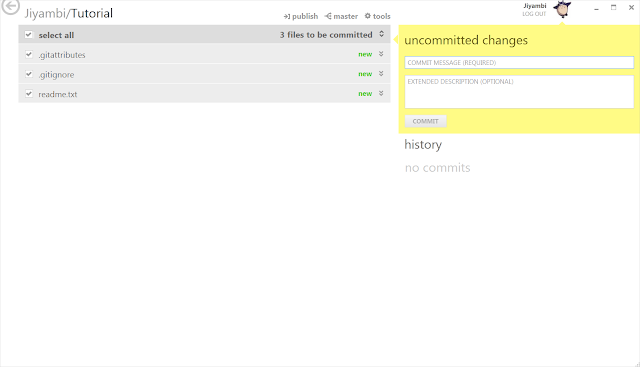
  7. This is the repository view. The files are listed on the left, with the history of the repository on the lower right, unsynced changed above that, and the current commit message at the top right. Right now we have only a few files, and no history or unsynced changes. You'll notice that there is a little "new" message next to our three files - the program is telling us that these files were not previously part of the repository. On the left of those files, you also see a check box. Generally you want to leave this checked - this tells the program that we want these changes to be part of our commit.
  8. Lets go ahead and make our first commit. Type in a commit message. Often with the first commit you just want something like "Initial commit" - but always try to make the message as descriptive but succinct as possible (a few words only). You can put more details in the extended description as needed. When you're done, hit "commit"!
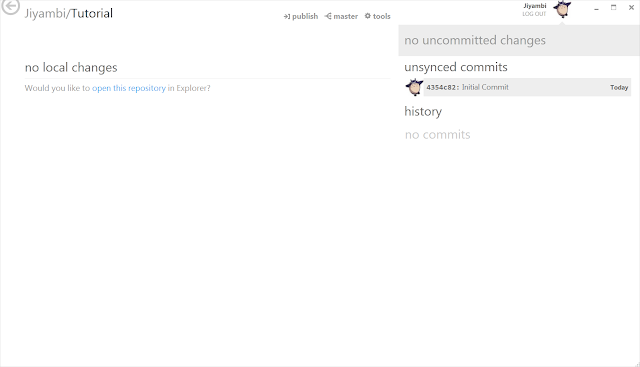
  9. You'll notice the window has changed, it will now look something like this:


    Our files are no longer listed since there aren't any changes now. On the right, we now have an entry in "unsynced commits" - the commit you just made. If you select it, the left side will now show the changes that were made during that commit. This is very handy since you can go back and look at when certain changes were made. You can roll back to a previous commit using this interface by clicking one of the two buttons at the top - either "revert commit" to reverse the changes made by the commit, or "roll back to this commit", which reverts back to a state just after this commit was made. Both would be silly at the moment, but can be very useful for long-term projects.
  10. Let's go ahead and upload our change to the remote repository on github.com. This is very easy to do! Just click "publish" at the top of the window - normally this will say "sync" but since this is our very first commit for this repo, it will read "publish". It will take a moment to upload, then the "publish" command will change to "in sync", meaning your local repository matches the remote one. Always check for this when preparing to work, especially when working on a group project. You'll also notice your commit has moved from "unsynced commits" down to "history" - meaning it is now part of the github repository history.
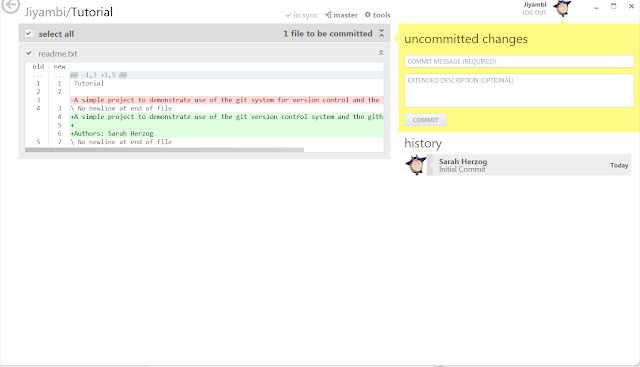
  11. We've made our first commit and published our first repo to the remote repository! Let's make a quick change so you can see how the differences look. Open up the file browser again and edit the readme.txt in some way - add a few more lines of text (maybe an author section) and modify some of the existing text. Save your changes, and head back to the GitHub GUI window. You should see your changes represented on the left (you may need to click "show" on uncommitted changes at the top right):


    As you can see, the changes are represented as lines added or lines deleted. If you change a line, it counts as deleting the old line and adding a new one. Git conveniently tracks line numbers as well, something most programmers should be familiar with.
  12. Go ahead and commit your change and sync it with the remote repo.
You now have created a repository, added files to it, published it, made changes, and submitted the changes! That in itself is pretty awesome, but that's not all git offers. Lets go to the website to see what other cool things we can do.

Github Repository Website

In addition to simply hosting your remote repositories, the github.com website has a lot of cool features. First of all, it makes coding a social experience by allowing you to browse other code with ease, and allows you to follow other coders. Your repository also has a built in wiki and issue tracking system, great for documentation and organizing ongoing work on the project. Last but not least, there are a lot of great ways to view your repository and statistics about your commits. Let's look at some of those now.

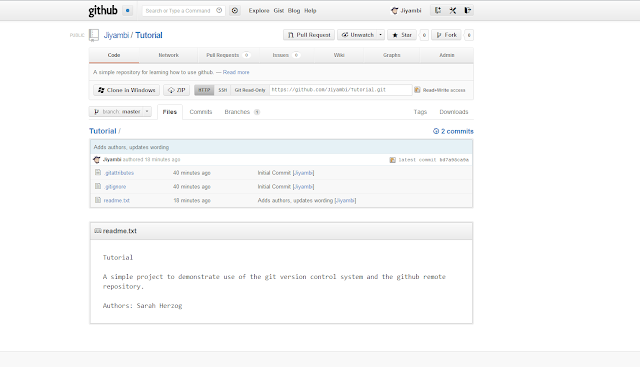
  1. Getting to your repository is very easy. The address is simply github.com/YourLoginName/RepoName. You can get there even easier if you already have the GitHub GUI open by right-clicking the repository listing and selecting "view on github", or by clicking the "github" text at the top of any commit. Once you get there, it should look something like this:

  2. From here, you can see your current commit and browse the files right in the web brower. For text files (most code falls into this category) you can actually see the file's contents, and there is syntax support for most common langauges. You can even directly edit files right in the web browser, great for quick fixes on the go.
  3. The Network section shows a nifty graph of all your commits to date. It's rather boring if you are working on a project alone, but it can be useful and much more interesting if you are working with a group of people, especially if they have separate forks. What is a fork you ask? Basically, someone can create a separate instance of your repository on their own github account, and work on it independently from you. Later, they can submit a pull request to you, and you can decide if you want to use their changes. This is a bit advanced, so don't worry about it too much to start with. Once you get comfortable with using version control, I do suggest reading a bit more about it and the other powerful features it has to offer.
  4. Pull Requests are again mostly useful for group projects. If someone forks your repository, they can submit a request for you to pull in changes they have made. This can be useful if you don't want to give someone collaborator rights to your repository, but still want them to be able to work on it. Many open source projects are handled in this fashion.
  5. Issues is a section for issue tracking. This is extremely useful, but the full features of this section are beyond the scope of this guide. Basically, you can create issues, categorize them, assign team members to them, add due dates, make notes on them, and add them to groups called "milestones". Obviously useful for bug tracking, the issue tracking system is also great for tasks during development.
  6. The Wiki section is great for documentation, such as a Game Design Document, or feature set planning. It supports most common wiki mark-up languages, including MediaWiki (what Wikipedia uses). Note: if you can't see the wiki, make sure you are logged in.
  7. The Graphs section contains a set of representations of your commit data. The usefulness of these varies, and for simple projects you will most likely ignore them.
  8. Admin is the section where you can change settings for your repository and it's github page. You can add collaborators here as well as change wiki and issue tracker settings. There are other options, but as a beginner those are the most important.
Now you know the basics and you're ready to start using GitHub for your own coding projects! Please do use version control copiously - it's so important to maintaining a good project and IS used in industry. It can save you a lot of time and heartache in the end, and the added bonus of easy access to your code from anywhere via github's website is really unbeatable.

Thursday, November 8, 2012

Github for your desktop?


I've used Git and Github for a long time, but up until today I've just used Git's Windows GUI. Syncing with Github, especially on a new computer, was always an exercise in frustration as I set up SSH keys, invariably messed up my cloning of my remote repo, and generally made a mess of things. I got a lot better after getting some experience with Linux, but for a "layperson" just getting into programming, Git and Github would be extremely inaccessible.

I'm very, VERY pleased to say this is no longer the case. Github now has a Windows application which makes this entire process trivial. Instead of faffing around with setting up SSH, going through a separate program to clone repositories, hunting for the proper address for the remote repo, and generally having a bad time, with the new app you simply log into Github and instantly have access to all your repos. You can clone them with a push of a button, see a lovely visual representation of all previous commits, and with another click go to the local location of the repo. New files show up instantly to be added, and you can commit and sync with github easily.

I can't rave about this app enough - it finally makes Git accessible for newbies on Windows. I sincerely hope this pushes Git forward as a version control method for Windows users.

Get your copy (for free, of course) here: http://windows.github.com/

Monday, November 5, 2012

Programming for Hire

I'm starting a new experience this week. My good friend Millie, who is doing a professional master's program at Abertay, is asking me for help with her project. I'll be doing some contract-style coding (though of course all on a volunteer basis). Up until now I've either worked in teams with evenly shared control and responsibility, or on my own. This will be the first time I've worked on "someone else's project" so to say.

I am actually quite excited. I've never been an "idea person", but I'm pretty good at executing other people's ideas. I'm hoping this will give me some good experience working with a team, as well - I've very seldom done team programming, so this will be a great start. It will also give me a chance to brush up on my C++, as well as the library we are using, Allegro. More on that in another article.

As I continue doing work for Millie I'll report back with my results. I'm looking forward to what should be a rewarding and educational experience!

Sunday, November 4, 2012

Github vs. Bitbucket, Part 1

In the past, I've always used Github for my online repository needs. It has a wiki and issue tracking system for each repository  as well as a very nice layout of the files in the repository, syntax highlighting  and the ability to edit files from the website. In addition, it's got some very nice graphical representation of commits and contributions from individual users. The main drawback? Private repositories cost money.

However, I was recently recommended Bitbucket, a similar online repository website which allows free private repositories. I've decided to take a look at it, and so far I've been pretty impressed. It shares the features of a wiki and issue tracking system, which is a big plus as I like to keep my game design document online in the wiki along with the code. I haven't uploaded a repository yet, but I'm hopeful it will have similar features to Github. The fancy graphs may be missing, but how useful were they anyways?

I'll be using Bitbucket for one of my personal projects. We'll see how useful it is in practice, and I will report back with a full comparison of the two services for your viewing pleasure.

Saturday, November 3, 2012

Day of the Nerd: Learning RPG Maker

We live in a world increasingly full of useful tools that make game development accessible to everyone, even those without programming experience. I'm a member of the Game Development Society at my university, and my group (calling ourselves Day of the Nerd) has decided that our team will be using RPG Maker to create a game in our spare time. Normally I wouldn't bother learning a tool like RPG Maker, and would be focusing on more technical mediums such as C++ or at least C# or Java. However, since this is going to be more of a fun project in our free time, I think it will be nice to use a tool that makes the process much easier, while possibly sacrificing customization power and run-time efficiency.

My role in the group will be programmer. Specifically, I will be learning the scripting system of RPG Maker. It uses Ruby, a scripting language I've not had any experience with previously, so it will be a chance to learn both a new technology and a new language on top of that.

I've also noticed my team-mates don't have much experience with game design documents (GDDs) or with version control tools. I'm hoping to help them learn about these useful subjects so we can use them in our project.

Overall I'm cautiously optimistic that the process will be a good learning experience, and help add another item to my portfolio.

You can learn more about RPG Maker on their website: http://www.rpgmakerweb.com/

They have free 30-day trial versions of all of their RPG Maker products, and several versions of the program to cater to different development needs - some as cheap as $30.

I'll be using tutorials from all over the internet, but I've found some useful ones here: http://rmxp.tigerseye.uk.com/

They are well written, easy to follow, but a bit simple. I'm hoping to find some more advanced scripting tutorials, and will share those when I try them out.

Friday, November 2, 2012

AI Planning

AI is one of the most important facets of a game. It not only provides interesting and challenging gameplay, but is also vital to a player's immersion. Choosing the right AI method to use is a very important decision, and one which depends heavily on the circumstances of the game and the development company.

There are many types of AI to choose from, but today we'll look at three different AI decision making methods - finite state machines, GOAP (Goal-Oriented Action Planning), and behavior trees. We'll use a simple problem that the AI entity must solve, to compare these methods:

“An NPC is standing on the bank of a river, and he wants to get to the  other side. He can walk, swim, and sail. Walking is the most  preferable, but can only happen if there is a bridge. Sailing is the  second most preferable, but can only happen if there is a boat.  Swimming is the last resort.” 

Finite State Machine

In a finite state machine, the different behaviors the entity can exhibit are sectioned off into states, which are connected by transitions, often accompanied by some condition. 


In this case, I represented the different conditions (bridge, no bridge, no boat) as separate states to keep the diagram from looking so cluttered with transitions, but this probably would more accurately have been represented as one state (where the behavior was standing on the river bank) with multiple transitions, each with their own conditions (bridge, no bridge but boat, no boat or bridge).

The advantage of a finite state machine is that it is fairly simple to understand and implement, and that you can represent pretty much any behavior in this fashion. The disadvantage is that the programmer must explicitly define all behavior and transitions/conditions manually, which can require a lot of time. Additionally, when representing vast complex actions, the FSM can become convoluted and difficult to follow.

GOAP

GOAP sacrifices run-time speed for development speed, placing the burden on the entity to make decisions based on action weighting and constraints. A GOAP representation of a problem consists of a goal, an initial state, and a set of actions the entity can choose from to reach the goal from the initial state. Each action must have a weighting, an effect, and a precondition.


GOAP can either build toward the goal from the initial state, or build backwards from the goal state towards the initial state. Both methods use a state space search method to build an optimal solution. In this case, we have a post condition where we've crossed the bridge. The GOAP system then Finds an action from it's database of possible actions which has an effect matching the end goal. Next, it checks if the precondition for this action is satisfied by the initial condition. If so, it has a possible solution, if not, it continues selecting actions matching the current state (effect) until it reaches the initial condition - though if no actions can reach the initial condition, it abandons the possible solution. Once it has a possible solution, it checks the value of the solution by adding up the weight of all the actions. It keeps doing this until it finds the lowest value solution, using a heuristic to perform a state space search. 

As you can imagine, this takes a lot of processing power, especially if there are many actions available. The trade off is that it makes the workload on the programmer much less, since he or she needs only code in possible actions for an entity, and the entity creates it's own solution for each particular problem. Compare this with creating a finite state machine for every possible problem, and you can see how it is easier on the programmer. For projects with limited programmer resources (time or number of programmers), this can be a great choice.

Behavior Trees

Behavior trees (actually directed acyclic graphs or DAGs) represent a breakdown of a task into smaller tasks. These break down until you reach the leaves of the tree, which represent the interface between the AI logic and the engine. These include conditions and actions. A task will continue to run it's action as long as it's condition is true, or until the action is complete. Parent tasks choose which child tasks can be run. This can be done in sequence, or by selection based on conditions. In a sequence, the parent task deals with the success of a child task by moving on to the next task in the sequence. For a selector, it tries to execute a child task and deals with failures by moving onto the next. Essentially, sequence moves on success while selector moves on failure.


In this example, the main task is to cross the river. Since there are several ways to do this, and not a sequence of ways, this will be a selector type task. It will try child tasks from left to right, so higher priority tasks go on the left. First it will try to walk over the bridge. If there is a bridge, this task will carry out until either it completes (success) or until there stops being a bridge (failure). As you can see, this allows for a change of action in the middle of the task, if for example the bridge is destroyed. A success of any of the tasks causes the parent to stop trying other child tasks, and return success to it's parent. Failure of all child classes will cause a return of failure to the parent - the bridge cannot be crossed in that case. However in our example, that won't happen, since the final child task (swim) has no conditions - it is always possible.

The tasks used for behavior trees have the advantage of being re-useable. They have the advantage of being more efficient during run-time, but they do take longer to create than a simple database of actions as in GOAP. However, it has been proposed to combine these two methods, using planning to dynamically build behaviour trees out of a database of tasks. This would allow programmers to explicitly define behaviour trees when it makes sense to do so, saving run time resources, but to build them dynamically when necessary.

Conclusion

No single AI method will be ideal for every game and every dev team. As with most development choices, it depends entirely on the circumstances. However, by combining AI techniques, smart programmers can get the best of both development and run-time efficiency.

Thursday, November 1, 2012

State of the Blog

Hello readers!

I've let my blog stagnate quite a bit of late. With my move to Scotland, starting my course, and meeting all sorts of new people, this is understandable. However, I've let my drive for professional development lapse as well, and that's not something I want to happen. Because of this, I've decided to try and post something every day here on the blog. The posts may be short, but they will happen!

Due to my coursework, I'll have a lot of interesting topics to cover. I've been reading a LOT of industry news lately, so I'll almost certainly be covering some topics in gaming news. Additionally, I'm taking a class about gaming AI, and have to write one blog post a week for that class, so I will most likely post that here as well. I am also working on three major gaming projects, and will provide update and insight into my development progress here as well. Finally, I will occasionally have personal posts, mostly relating to my exploration of the beautiful country of Scotland.

I hope I can provide some interesting content for readers of this blog. But, more importantly to me, I hope this commitment to gaming industry related content will help keep me developing professionally outside what is required in my course. Wish me luck!

Wednesday, September 26, 2012

Turing Test in Games

In my AI For Games class, we've been instructed to read Turing's original paper "Computing Machinery and Intelligence", in which he describes what is now widely called the "Turing Test" for judging the quality of an artificial intelligence, and describe how we might apply such a test to game AI. I thought this was a pretty interesting idea. Our responses to this prompt were not supposed to be particularly long or formal, so I thought I might post mine here and my readers may enjoy it.

Summary of the Paper

For those who don't know, Alan Turing was a brilliant mathematician and scientist active in the 1940s and 50s, and is widely considered the father of computer science and artificial intelligence. In his paper "Computing Machinery and Intelligence", Turing makes the case that not only will machines one day be able to learn and think, to have intelligence, but also that the best measure for this intelligence is to compare the machine behaviorally with a human. I personally am not sure I agree with this as a good measure of a machine's intelligence, but for now we will take it as a given rather than delve into the definition of intelligence.

In the paper, Turing describes a method for comparing a human and computer which he calls "The Imitation Game". A computer and human will interact with a third party, a human judge. The judge will be able to neither see nor hear the computer and human, but will communicate via typing. The judge asks questions of both the human and computer, and must decide which is the computer. The computer's goal, therefore, is to act as human as possible so as to convince the judge. The current time limit for this test is 5 minutes, though of course fooling a judge for longer would be ideal.

Though Turing expected it would be possible at the turn of the century, at this time, no one has been able to programme a computer such that it can fool a judge for the full 5 minutes.

My main issue with the Turing test is that rather than judging a computer's ability to learn things from experience and grow and change based on them, or have unique individual "thoughts", it instead judges a computer's mastery of a human language and ability to manipulate said language in a way similar to a human, in addition to its actual responses. I don't feel that the ability to use a language well is necessarily evidence of human-like intelligence, nor that it will always be present in an intelligent machine. However, I do understand the reason Turing used such an approach - the definition of intelligence is a tricky thing, and using a behavioural test is much simpler and cleaner way to judge AI.

Turing Test as Applied to Games

Games are an intriguing instance of machines interacting with humans, because AI within a game has a much more limited way to interact. For now, let us consider only the case where AI is controlling a "player" entity (either opposing or helpful), which might alternatively be controlled by a human player. This is the situation which makes the most sense to look at from a Turing test point of view.

In this situation, let us further stipulate that in-game chat systems are not being utilized, neither voice nor text based. Now the ways that players can interact are limited directly to the game mechanics. A Turing test in this situation would involve a third party judge player playing the game with two other players (either at once or in separate instances, as the game allows), one a computer AI and one human. The judge must then determine which was the computer and which was the human.

This seems fairly straightforward, and actually somewhat uninteresting. By limiting interaction so severely, is the test actually meaningful? Are we only judging how well the computer can play the game, and not how well it can respond and react like a human? The answer would greatly depend on how interactive the game is and how much on the fly strategy changing a human might be able to do in said game compared to a computer.

In my description of the game-based Turing test, note that I specified "playing the game with" rather than "playing the game against". Certainly in many cases the latter will apply, but I don't believe such a test need be exclusive to opponent AIs. Helper team members are a notable example.

When thinking about the ways in which players interact without using language, I immediately thought of the game Journey, released earlier this year for the Playstation 3. In Journey, the player moves across a desert toward a distant point. Occasionally players cross paths - but rather than allowing speech between players, the game limits interaction to visual movements of the player's avatars, ability to charge up each-other's items, and to using a series of different musical sounds. What these sounds mean is not defined - it is a language created each time two new players interact, by the two players themselves.

While there are not AI players in the game, it seems like an intriguing idea to create an AI who might be able to pose as a player in Journey and see if it could interact in such a constrained environment well enough to fool a judge in the Turing test. This puts both the player and AI on the same foot when it comes to "language" yet still allows a very organic interaction compared to typical game mechanics.

Other Reactions

In addition to his discussion of the test itself, the final section of Turing's paper was devoted to discussing ideas about machine learning. One analogy he made struck me: picture a mind (be it human, animal, or machine) as fuel for a nuclear reaction. A stimulus to the mind is like a neutron being fired into said fuel. If the fuel is sub-critical, the reaction will carry on for a brief time and die away - or, as another simile of Turing's poses it, "like a piano string struck by a hammer". This is similar to how a typical machine "mind" might act - a stimulus is supplied, it's programme runs in response, but eventually runs out of new instructions to execute (even if in a loop, it's the same instructions over and over). Turing posits that most of the time, human brains also act in this way - and animals always do. But if the fuel is in super-critical concentration, the reaction won't stop - it will grow and grow. The example Turing gives is, "An idea presented to such a mind that may give rise to a whole 'theory' consisting of secondary, tertiary and more remote ideas." A stimulus causes the mind to come up with a poem, a mathematical theorem, a new invention. In other words, this super-critical mind can be inspired rather than just effected by it's environment. A single idea becomes a springboard for more ideas. The question Turing then poses is, can we create a machine mind that can act in this "super-critical" fashion?

This really stuck with me as a much better description of my view of true machine intelligence. Not aping human behaviour but instead the simple yet extraordinary ability to take in a stimulus of some sort and produce something, not based directly from that stimulus, but some product of all the previous stimuli the machine experienced as well as the one just taken in. Whether this has direct application to games is questionable, but it could be assumed that an AI with this kind of ability would be a more engaging opponent or ally in any game.

Turing goes on to discuss how we might develop an intelligent machine - and talks about creating a "child" machine instead of a full-fledged intelligent "adult" machine. This child machine would have the ability to learn based on positive or negative responses, and to take in direct instructions in some form as well. While again this may not directly effect games, it describes a learning machine which would make a far more challenging opponent or ally than one using a pre-set list of strategies.

Conclusion

I feel that games suit themselves well as a possible application of the Turing test due to their constraint on methods of interaction between players. It would be more difficult or even impossible to use the Turing test to measure the AI of non-player controlled entities in games, however, as the entire approach is based on comparing human and non-human control - if no human control is possible, the computer can't possibly convince a judge of its supposed humanity. For these types of entities, other tests must be developed, or temporary human control must be allowed.

Sunday, September 9, 2012

Journey to Scotland


Well everyone, I've finally arrived in Dundee and am all moved in to my room at Opal! You probably won't get to read this until tomorrow, though, because dork that I am I forgot to pack an ethernet cord and everything closes at 5pm here, so I won't be able to buy one until tomorrow. I should have been here at 3, but the trip didn't go exactly as planned...

It started off well enough. Andrew and my parents drove me to the airport at 5 am Friday morning, sending me off with many hugs and then waves as I went through security. The trip to Dallas, where my first layover was, was fairly uneventful. The seats were too small for someone of my noble girth, but I was used to that - it still put me in a foul mood by the time I got to Dallas, though. Luckily I had a 4 hour layover to improve my outlook - I spent a full hour in TGI Fridays eating tasty chicken and relaxing. I changed over my money in Dallas, since I wasn't sure I'd have time in my later stops - it was so exciting to get UK currency! Did you know their bills are all different sizes depending on the amount? It helps visually impaired sort their bills, what a great idea! They also don't use bills for anything under 5 pounds - there are 1 and 2 pound coins though.

Finally it was time for the trans-Atlantic flight from Dallas. The plane was HUGE - 9 seats to a row! Every seat had a little TV and you could choose from 10 or so movies as well as current tv shows and documentaries. Pretty slick! The seats were also much more comfortable. And best of all, I got some really nice seat partners - a small family from Bologna, Italy. I sat next to the mother, and we chatted in broken English off and on for the flight. Thank you for making my flight much better, random Italian family!

I was able to sleep a little on the plane, but was still feeling pretty tired when we pulled into London Heathrow airport. That's when things started going terribly wrong. First of all, our flight was a little late arriving. We then sat on the plan for about a half hour while we waited for them to manually set up the boarding ramp since the auto machinery was broken. I began to worry about my transfer, but only a little. I still had an hour, surely that would be enough.

As soon as we got off the plane, there was a woman waiting to give us some sort of express pass - seems they were worried we would not make the connecting flight. I speed walked at this point - and I speed walked a LONG way, just to get to the terminal transfer bus. Heathrow is HUGE! The transfer bus had a really long line, so I didn't get on the first one that came. It also ran very slowly compared to the little train in Dallas. Finally I ended up in Terminal 5, where my new flight was. The woman meeting us there didn't bother with an Express pass. "You won't make it." She said. I look at her incredulously - I still had half an hour, I was at the correct terminal, and I didn't have a chance to make it?

She ran with me anyway, to an area I would learn was the border entry area - another LONG distance, and one I did not run with ease. The woman behind the counter shook head at us. "You'll have to get on the next flight."

My plans started falling apart. The next flight? I'd miss my train! And my appointment to check in to my apartment! In their emails, my apartment complex Opal had seemed very adamant that you must check in during you allotted time. But I calmed myself. I would call them and figure it out, it would be alright. Still, my stress level began rising.

I was taken over to a customer service area. Funnily enough, my Italian family that I made friends with on the plane were also here, having missed their flight as well. A very, very kind woman at the service desk hooked my up with a flight two hours later, and allowed me to use her phone. I called and changed my train ticket, paying almost 4 times again as much as I had for the first ticket. It was still only 22 pounds, not the end of the world, but it irritated me. Then I called Opal - no answer. I left a message explaining the situation and asking if I could check in at 5 or 5:30, my new arrival time in Dundee, and if not, if I could check in the next day - I figured if worse came to worst I could stay at a hostel in Dundee that night.

With new boarding pass in hand, and thanking the customer service lady profusely, I went to the UK Border counter. Here I met my next obstacle - apparently the customs forms I had painstakingly filled out before leaving were not what I needed, and despite what the woman on the plane had told me, I needed to fill out the small blue form they had passed out there. I sighed and sat down - it wasn't much information so I didn't mind too much. I brought it to the counter, hoping I wouldn't have to have my luggage searched. I was surprised I had to do customs here, where I didn't have my checked luggage. The man didn't even ask about what I was carrying. I had worried so much about that, and he didn't even care - guess I could have brought gifts of Oregon jam and such after all!

Unfortunately, I wasn't free to go - the machine refused to recognize my fingerprints, reading not a match even after trying several times. I began to worry. The man took me to another booth with another machine, with the same results. They asked me to sit down while they contacted a superior.

At this point, I must admit, I began to cry. I was exhausted, having been up for 24 hours now with only fitful naps on the plane. I was sweaty from running and not having showered in over a day, and felt disgusting. Every muscle hurt, and I had huge bruises on my legs from the arm rests on the plane. My tow was smashed from my suitcases. I had missed my flight, I had no idea if I would have a place to stay, I couldn't access the internet or my phone and I didn't even know how to dial numbers in this country properly. I was NOT looking forward to wrestling my checked bags from the airport to the train and then to my apartment. I was all alone, and to top it all off, I felt in real danger of being deported. Fingerprints are how they know you aren't a felon in your home country - if they thought my original fingerprints were not run correctly, I could see real grounds for not admitting me into the UK. I also began to worry that even if I was let through, I would miss my new flight as well.

After a little while, the man at the booth called me up and said it had simply been a hiccup in the machine, gave me my passport and boarding pass back, and sent me on my way. He never talked to a superior about me from what I saw, and I didn't have to scan my fingers again. I am somewhat convinced he simply took pity on my crying there, and overrode the machine. But I'll never know.

Next, it was on to security. Yes, the UK makes you go through security again! And if you thought US security was a slow, annoying process, you've clearly never been through a UK airport. The US is streamlined and efficient by comparison. Every bag was stared at for what seemed like five minutes in the x-ray machine. They made me take my box of hard drives out and send it through again, though I didn't really mind - they let me keep it and that's what's important. The metal detectors we had to walk through were hyper sensitive. Everyone ahead of me set it off - and then, instead of using a handheld detector like they do in the US, they frisked the offenders. So with some trepidation I stepped through - but somehow, my bad luck must have taken a break - I didn't set it off. Collecting my bags at last, I headed out only to find that gates aren't assigned to flights until just before boarding. Tired, worried about missing the flights, I waited. I got a water, fumbling with my UK money embarrassingly at the counter. "Sorry, I'm not used to these coins yet..." "That's alright miss, that's a 2 pound coin there. Here's your change." Great, now I had more coins to be confused about. I thought about getting a meal at one of the restaurants, as I was getting pretty hungry, but I was too concerned about missing my flight to chance it. Finally my flight gate was assigned, and thankfully it was very close by. I went to the gate and waited for what seemed like another half hour until the plane arrived.

This plane was much smalled than the last, though bigger I think than the Dallas plane. The seats were very cushy and comfortable, though the seatbelts were too small for someone of my noble girth and I had to get an extender, to my embarassment. I was in a center seat, which I hate, but was just happy to be where I was supposed to be. Thankfully I got on early and had a place for my luggage without trouble - that is one thing I was lucky with the entire trip, as some people were forced to check their carry-on on both previous flights. I was paranoid about loosing my luggage, especially now that I'd changed flights, and didn't want to chance it.

Anyway, it took quite a long time for us to take off. I began worrying that I might be even later into Dundee - but I didn't have to worry about the train, at least, since I had a flexible ticket now that would let me take a later time if needed. Things went better than expected, though. No one showed up for the window seat next to me and I got to scoot over and look out over the UK as we flew. I didn't see much, however, as my exausted body pulled me into a deep sleep as soon as we were at cruising altitude. I woke as we were landing - the flight had taken less than an hour, making up for the long wait before takeoff.

In Edinburgh airport (much smaller than Heathrow), I headed to baggage claim. Unlike at PDX, they offered baggage carts without charge. I grabbed one and waited for my luggage to come around. To my relief (tempered by my knowledge that I would have to deal with the bags without a cart at least for a short time at the train station) both of my gigantic checked bags arrived. I wrestled them onto the cart with the help of a kind bystander, and headed to find out where the shuttle to the train station picked people up. But, staring at the huge pile of luggage on my cart, I decided I'd rather pay more for a taxi whose driver would help me load and unload the luggage, rather than try to bring it on a bus. I waited in line and eventually got a cab, the kind driver helping me with everything and chatting as we drove to Haymarket train station in downtown Edinburgh. He had an extremely thick accent, and I began to reallize how difficult it would be to understand some people in my new home. Still, I got through the conversation well enough. "Your going to have trouble with your bags at Haymarket," he mumbled from the front seat. "The road's closed, I'll drop you as close as I can but you'll have to walk a block to the station." I smiled and said I would figure it out, but inwardly groaned. My worst fear, reallized. One block isn't much at all, but with more bags than hands to carry them, it's quite a long way.

The cabby was true to his word and repositioned the cab once in order to get me right next to the walkway to the station. I thanked him profusely after he unloaded my bags, and wished him a good day. In turn he wished me luck and headed out.

Staring at the long walk to the station entrance, with no luggage carts in sight, I sighed and turned to my bags. I pulled up the handles on my largest case, picked up my carry-on roller bag, and set it on top of the case. It was precarious, but if I leaned the case forward to drag it, the smaller bag stayed in place. I hefted my shoulder bag, grabbed a handle in both hands, and scooted slowly backwards down the walkway. I'm certain I looked absolutely ridiculous, but I discovered that walking forwards was simply not an option. After several stops to rest, I finally arrived at the station entrance. Awkardly maneuvering inside, I checked in and got my tickets. There were still no luggage carts in sight, to my extreme dissappointment. One of the station employees helped me through the checkpoint, since my bags made it impossible to go through the turnstyle properly. I found my platform, staring at first increduslously at the stairs leading down, then happily discovering a lift nearby. Then it was time to wait again.

About a half hour later, the Dundee train arrived. I move toward it, but the doors closed just as I got to them. Worried, I looked around. "Are you boarding, miss?" A train crew member asked in a very thick accent. Not having understood him properly, and also distressed and not thinking clearly, I just stared and held up my ticket. "Yes, this is the Dundee train, but you can't take that luggage on here, come on." He led me to another door and helped me get my luggage on board the train. "You have entirely too much luggage," he scolded. Feeling rather raw, this nearly brought me to tears, but I forced myself to ignore it. I stowed as much of my luggage in a rack nearby as I could, though one bag had to stay in the entrance area of the train as it was just too big for the rack. And at last, we were off to Dundee.

The train ride should have been very enjoyable. The seats were comfortable and it afforded a gorgeous look at the Scottish countryside. I'll have to ride it again when I'm not fuming with irritation, exaustion, pain, and worry. As it was, I actually fell asleep occassionally on the two hour ride, to my surprise. The train was nearly empty. I woke up in time to stare out happily over the Tay bridge, seeing the larger and prettier driving bridge further downstream, and all of the city of Dundee laid out on the shore ahead. It was a truly welcome sight.

I gathered my luggage and clamored off the train once it stopped in Dundee. There wasn't a large hurry this time as this was the final stop. Resigning myself to the horror of dealing with my luggage again, I began setting my bags up as I had at Haymarket station. This is when everything started going right again. "May I take one of your bags for you, miss?" asked a man who had just gotten off the train. He wasn't an employee, just a kind looking middle-aged gentleman. I smiled up at him "That would be a huge help, that's very kind of you."

He helped me to the main station, where I got another pleasant surprise. After asking a station employee for help getting through the turnstile, he asked bewilderedly, "Why aren't you using a stroller?" I stared at him in confusion, never having heard that term describe anything other than a baby stroller. He pulled a luggage cart out from behind the desk to clarify. I smiled again, even larger this time. "That would be wonderful!" I sent my mysterious helper on his way with a thank you, and piled my luggage once again on a rack. This one I had some trouble with at first until I discovered you had to push down on the handle to release an automatic break. The station employee directed me to a public phone and the taxi pick up area, both upstairs.

I got to the lift and almost had another difficulty - at first I couldn't get the luggage rack into the lift - then, I couldn't get it out. Finally I managed to do so, accidentally ramming into a "call for help" button in the process. Oh well. I made it to the pay phone, inserted my money, and tried to dial the number for my apartment complex. However, I'm unfamiliar with UK numbers and I guess I didn't dial correctly. I tried several times in several different ways and couldn't get it to work. But I didn't despair - my mood was much improved by the help I'd gotten so far here in Dundee. I went up the ticket salesman and explained that I was having trouble dialing, being from out of country. I showed him the number. Rather than showing me how to dial it, he just used the station phone and dialed it for me, for free. I nearly wept in relief as someone answered on the other line. It was very quiet, and the station was loud, so I had to confirm that it was the right number. But it was! "Can I come check in now? My name is Sarah Herzog, I missed a flight connection in London and I'm very late, I was supposed to check in between 3 and 4." "Of course, come on over!"

I smiled broadly at the man behind the counter as I hung up. "Thanks, you saved me!" Cheerily I brought my luggage to one of the waiting taxis. The driver was a curmudgeonly old Scotsman, with a thick accent just like the last driver. We loaded in my luggage and I showed him my address. "It's just north of Abertay University," I explained. He nodded, and we were off. This one didn't try to engage me in conversation, for which I'm rather glad - I just wanted to get where I was going and collapse. We pulled in and I saw people running around everywhere, with Opal employees greeting new tenants. The cabby helped me unload at the curb, then headed out. A woman with an Opal badge walked up to me. "Oh, we'll get some strapping young lads to carry these bags up for you. Follow me, we'll get you all checked in." I sighed in relief and abandoned my bags with another Opal employee, and went to pick up my electronic entry key and mail key, as well as paperwork. I got into the lift to head up to my flat, discovering that not only did this building not use US numbering for its floors (obviously) it also didn't use typical UK number. -1 was the ground floor, then 0 was what the US would call the second floor. I was on floor 1, the third floor for US folks.

My luggage had already arrived outside my room. I happily pulled it inside, closed the door, and collapsed on the bed. I was in my new home!

Pictures and description of my apartment coming soon!

Monday, July 2, 2012

Audio Novel Review: Naamah's Curse

I've recently purchased a platinum membership on audible.com in order to catch up on some good fiction. I seldom have time or energy to read these days, so audiobooks are ideal for me - I can listen while doing menial tasks or traveling, as well as anytime when I would normally be able to read. Additionally, audiobooks won't cost anything or be a bother to transfer when I head to Scotland in the fall.

My most recent listen was actually the second book in a series, and the third series set in the world of Terre d'Ange, an alternate/fantastical history series by Jacqueline Carey. I'll own upfront that I love the setting and the series so far, and was quite looking forward to this one. This is the first book in the series that I listened to on audio, however - and it did not disappoint.

Carey's books are beautiful and also very sexual in nature, but often also capture a high adventure feel without the ridiculousness of high fantasy. The setting of Terre d'Ange's world is one very like our own, even in the geography, religions, and languages - it's very clear that Terre d'Ange is meant to be France, Alba is Britain, and so forth. The difference is that in this world, the gods have a much more active and direct presence in the lives of the people, and magic is real - though not in the high fantasy style, with all it's fun yet unbelievable showiness. Instead, the magic in this setting tends to be subtle and quiet. Which is why I was surprised at first that this newest series follows the adventures of a bear-witch of Alba, with druid-like powers including the ability to make plants grow and to vanish into a magical Twilight. That said, this series still manages to capture the subtle, low-magic and high-wonder feel of the previous two in this setting.

Going into this book, I wasn't sure what to expect next. The main character, Moirin, was swept into a strange series of events in the last book that left me somewhat less engaged than usual for Carey's writing. I hoped this book would take a turn back to the gripping, page-turning interest that previous installments had provoked in me, and I wasn't disappointed. I think the main difference was that things were very personal for Moirin from the beginning of this story. In the previous book, she took it upon herself to help a Chinese princess who was possessed by a dragon, but it wasn't really about Moirin herself. In this book, she begins by searching for her love Bao, and is dragged through all sorts of hardships in order to reunite with him, meeting a horde of interesting and engaging characters along the way.

As usual, Carey takes us on a journey through many lands and religions, showcasing a fundamental Christian Russia, the nomadic Tartars, and both Hindu and Buddhist Indians. We see a much darker side of Christianity than was shown in previous books, when Moirin is captured and persecuted as a witch in Russia - but as usual, Carey's reverent treatment of all faiths brings the message that while some people may bend religion to suit their not-so-noble purposes, the gods themselves are full of love an acceptance. Through it all I was very impressed that while Moirin was a woman of strong beliefs, her personal fears and desires still often compelled her to make rash or unwise decisions, rather than becoming a glorified moral mouthpiece for the author.

The narration of the audio format for this novel fit the story well. Anne Flosnik, the narrator, was able to bring characterization to Moirin that I had been unable to feel from Carey's writing alone. When I read the first book, while I knew on the surface that Moirin was quite different from Carey's first heroine Phedre, I couldn't help but hear the story in my head in what I'd come to think of as Phedre's voice. Flosnik immediately remedies this with a pleasant Scottish accent that crystallizes Moirin's voice in my mind, and manages to pull off a Chinese and Indian accent where appropriate in the books. She performed voices for most characters, though many sounded rather similar, in particular the men's voices. Despite this, her reading is precise, elegant, and very suitable to the style of the book.

Should you listen?


Assuming you enjoy romantic (okay let's not kid ourselves, borderline erotica) fantasy, you can't go wrong with Carey's work, and this book is no exception. The audio format is clear and does not distract from the story. Better in my opinion than its predecessor Naamah's Kiss, readers of the Terre d'Ange series definitely won't be disappointed. If you haven't picked up anything by Carey before, I do recommend starting with Kushiel's Dart, the first chronologically in both the setting time period and in Carey's career. However, if you prefer a bit more magic (and a bit less S&M) in your reading, Naamah's Kiss (the first in the more recent series following the bear-witch Moirin) may suit your interest.

Have any recommendations for books to read, or thoughts on this or similar titles? Share in the comments!