Wednesday, November 28, 2012

Games Can Change The World


I recently re-watched Jane McGonigal's TED talk, "Gaming can make a better world". If you haven't seen it, you really should pop over and watch it - even if you don't buy in to everything she talks about, it's still quite inspiring. In fact, I'll just embed it here for you:


In the video, Jane talks about framing real world problems in game terms to take advantage of gamer habits. I think this is a wonderful idea, and actually fits in with some industry predictions I have been reading about. Dan Greenawalt, a Game Director at Turn 10 Studios, said in an interview with IGN that in 2020 he predicts  that games will become so integrated with reality that daily life will become the meta-game. You'll get achievements for going on a date, or have daily quests to clean the house. While this may seem silly, as a gamer we are convinced to do absolutely dull, drudgerous tasks over and over again through games all the time - and we enjoy it. If we can bring that into the real world, to solve big or small problems, why not?

What really captured my imagination is Jane's most recent project (as of the video) - using games in an education program. My friends and I have been talking about how, in a game, when you complete the game it's a demonstration of mastery of that game. The whole game is an exam. Can we structure learning of traditional subjects in this way, so that completing a class is it's own exam? It seems to me that anything, ANYTHING could be taught in terms of a game - and be the better for it. With things that are fun and engaging, our mind soaks up facts like a sponge. I remember the names of the cities and countries I've explored in World of Warcraft far better than the places I studied in my geography class, for example.

I'm not sure I agree with everything Jane says in the video, but I do agree that we can use games to improve the world. There's a lot of potential there, and with game-playing becoming more and more of a mainstream activity, I think we would be foolish not to try to tap into it.

Tuesday, November 27, 2012

Women In Gaming Industry - Lowest In Decade


Edge-online ran an article today placing the total percentage of women in the gaming industry at 6% - a shockingly low number that has actually fallen from 12% in 2006. This statistic has left many experts scratching their heads - at a time when record numbers of women are playing games, how is it their participation in the industry has actually fallen over recent years?

At this point it's not a matter of industry not hiring. And it's not a matter of girls not being in the gaming space, though the core gamers are still primarily men. It is true that the core gaming scene is still less than inviting to women, being full of sexist behavior. Still, I would expect to see higher numbers than this. Part of it may be that women are not willing to put themselves through the same terrible working conditions that men are putting up with in crunch - that men seem to have more raw passion for games than women. This is probably an extension of the core gamer demographic, again.

It would be interesting to see a comparison of the statistics for women in computer science, and women in each subgenre of gaming - for example, are there more women in mobile/facebook games? Are women in the gaming industry primarily artists, designers, or programmers? Unfortunately the original survey data at www.creativeskillset.org is rather thick to get through - it would be great to see this presented as an info-graphic or chart.

Being a woman coming into this industry, I'm a little concerned at the backward movement. While I'm not worried about blatant sexism, being treated as an outsider in teams is something I have heard about, and something that the industry gals over at GeekGirlCon have mentioned in the past. It's unfortunate that women in gaming communities and in the industry must prove themselves to be "real" in the eyes of their male colleagues - heaven forbid she might be a "fake" gamer-girl. That said, I personally haven't experienced any awkwardness in working with my classmates so far - I guess I come off as a fairly authentic gamer! Being assertive and honest seems to be a great policy in getting around as a female game programmer so far.

Tuesday, November 20, 2012

Creating a DirectX Scene - Planning


My coursework for my DirectX module this term calls for me to create a small scene rendered using DirectX. I struggled for quite a while with ideas for what sort of scene to create, until today settling on the idea of a space scene. In today's blog, I'll cover my plans for this scene and what features will need to be added. I'll give updates in the future as I work on the scene.

The Basics

For the basics, I plan to have a small solar system with planets rotating a sun at different speeds. The sun will serve as a light source. The viewer will be able to move around the scene and view it from different angles and locations. 

In class, we've already accomplished several of the basics:
  • Spherical model loaded in
  • Texture loaded for model
  • Directional, ambient, and specular lighting coded
  • Input processing added
In addition to these, I will need to add several features to create my minimal scene:
  • Multiple objects with models and textures loaded in at once
  • Movement of objects
  • Input processing to catch movement keys
  • Movement of camera (player)
  • Light comes from a point within the scene (direction vector depending on location relative to sun light source) rather than an external point (single direction vector the same for all objects)
With these features, I will have what I consider a minimal functioning scene. Once this is finished, I can build on it to make a more complex and interesting piece of coursework.

The Fancy Stuff

From the basics described above, I will continually add features to create a more interesting scene. These might include some of the following:
  • Sky-box - a background of stars and interesting space scenery
  • Asteroid field - more interesting models than just spheres
  • Space station - similarly, more complex model, perhaps with animation (rotating wheel)
  • Comet with ice trail particle effects
  • Space cloud particle effects
  • Fire effects around sun
  • Spaceship UI overlay
  • Lens flare - possibly an actual realistic reason for lens flare, seen through a spaceship wind-shield while looking at the sun!
  • Bloom - similarly, from looking at the sun

Blogging About It

I'll be keeping a development journal here on the blog for both this and my other coursework. This will help me stay on track with my coursework, assist in me in my final post-mortems of my work process, and I hope be an interesting insight into my work process. 

Monday, November 19, 2012

Games Are Serious Business

Are games a mature enough medium to tackle serious subjects? Gamesindustry International's Rob Fahey doesn't think so, but says we should keep trying anyway, in his article from earlier this year.

It's articles like this that continue to inspire me, and push me ever toward the indie scene. Innovation and tackling risky and difficult subjects seldom happens in the AAA market. It's simply too risky, and big businesses are beholden to their investors. But independent developers have so much freedom to make truly interesting games that challenge what the industry is capable of.

My good friend Merrit Kopas is a hobbyist developer in Seattle, whose free to play web-based games have garnered some notoriety in indie circles for tackling complex and vitally important topics. His game LIM deals with the idea of "blending in" - whatever that might mean for the player. Without any words, with only squares for characters, LIM communicates emotions and violence in a visceral, powerful way that can be felt far more deeply than any cutting edge graphics ever portrayed.

Other games which display this level of maturity include Loneliness, another browser based game. Dear Esther is often hailed as a masterpiece of beautiful storytelling, though personally I found it rather boring and pretentious. Games do not have to be all about "fun" anymore - these games show us this.

The existence of these games tell me that Rob Fahey was wrong - if you know where to look, games are already tackling difficult issues and handling them well. They are portraying powerful and deep emotions, and eliciting emotional responses from players. These may not ever become as fully integrated into mainstream gaming as pure entertainment games are, but even now AAA titles are tackling issues like this and receiving praise for it - take Spec Ops the Line for example, with it's startlingly dark and complex take on the typical modern military shooter. There's not just hope at the end of the tunnel - we are already here.

In an art course I took back in the USA, we were taught that art is a creation made with the purpose of eliciting an emotion from the person experiencing the art. If that person feels the desired emotion, the art was successful. Given this definition, games as art are not a thing of the future. They are all around us. If they can pull our heartstrings, make us laugh, cry, and truly care about the results of our actions in the game, then they have succeeded as works of art. There will always be games that aim only to entertain, and that's great. But games as art, games as mediums for difficult topics and platforms for discussion of important issues - yes, we are mature enough for this. More please!

Sunday, November 18, 2012

Wii U With Indie Friendly Features

A lovely article on destructoid today reported that the Wii U will not only allow developers to set whatever price they choose for their games - they will also not charge for patches to the game. This is huge, as Microsoft's exorbitant $40,000 charge to patch a game with their XBox Live service prevents many indie devs from posting games, or fixing buggy games after launch.

While I love the PC as a medium, it's really great to see console manufacturers supporting indie developers with services like this. We need the big AAA devs for the fantastic, blockbuster quality games, epic graphics, and lengthy stories. But my heart will always be with the rugged, risky indies, and I think that it is in the indie arena where the envelope is pushed and the industry is grown. It's very heartening that indies have more and more options going forward, and gives me hope that I may be able to be part of a successful indie studio someday.

Saturday, November 17, 2012

Where is J?

I am sick, and probably will be for another few days. Blame the damp, cold Scottish air. I'll be back to my regular posting schedule next week.

Monday, November 12, 2012

Newbie Guide to Version Control


After my last post about Github's awesome new desktop tool, and because I'm encouraging my friends and team members to use version control in their projects, I thought I'd write a guide to version control for the complete newbie. I'll be focusing on Git and Github because they are now the most accessible forms of version control, in my opinion.

What Is Version Control?

Version control is a way of tracking the changes you make to a project over time. Using a version control system such as Git, you can see a list of all previous versions of your project, and roll back to a previous version with ease. You can also "fork" your project to work on a separate instance of it, then merge it back together. Version control also works well in group projects because you can see exactly who made what changes, which can be very helpful when you need to ask someone about a piece of code. Additionally, version control systems usually support a remote repository - a place where the code is hosted online, which allows a group to share their work easily.

In this guide, the version control system we'll be looking at is called Git. The online repository hosting site we'll be using is called Github. Both are completely free to use, and with the recent desktop application from Github, are quite easy.

Why Do I Need Version Control?

Version control is vital to programmers. It can also be useful to any non-programmer who likes to keep multiple versions of their work. Have you ever made a major change to something, only to find you really liked it better before? With version control, it's very simple to roll back changes or to integrate stuff you deleted in a previous version. Many people, before version control, did this by keeping multiple copies of their project locally on their computer - but this quickly becomes a disk space hog and also can be quite confusing. Version control systems like git don't keep full copies of the project but instead keep track of differences, in a long line of differences going back to the original commit. This means that while the same information is saved, you don't have nearly as much space taken up by useless older versions of the project.

Version control with a remote repository has the added bonus of keeping you safe from hard drive failure, as it serves as a backup. Additionally, it is ideally suited to group work, giving a place to share work and a way to track who has done what. Github has many other features that help with group work, including issue tracking where tasks can be set and assigned, and a wiki where members can contribute and read documentation.

Installing Git and Github

To get started, we'll need both git (the program for the actual version control under the hood) and the GitHub GUI (the front end program we'll be using).
  1. Go to http://git-scm.com/downloads
  2. Choose your operating system
  3. Go through the Git installation, using the default settings.
  4. Download the Github GUI from...
    Windows: http://windows.github.com/
    Mac: http://mac.github.com/
  5. Create a free Github account: https://github.com/signup/free
    You can also pay for an account, which allows private repositories - however, I suggest trying out the free version first as it's very easy to upgrade later if you choose to do so.
You are now set up and ready to create your first repository! I'll guide you through this by making a sample repository with you.

Creating Your First Repository

Now that we have everything installed, it's time to create our first repository!
  1. Open the newly installed GitHub.
  2. You should see something like the following:
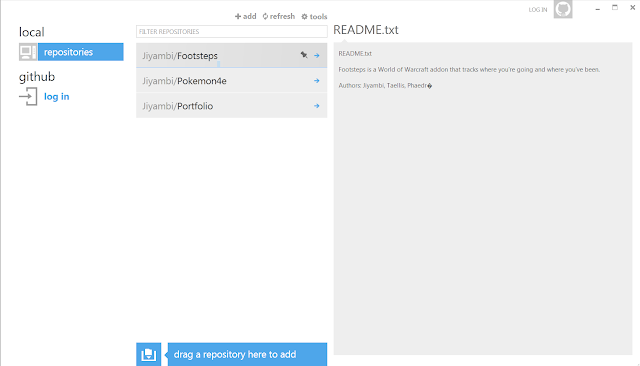


    You'll notice I have a few local repositories already, but you won't yet.
  3. On the lefthand menu under github, select log in and log into your new account.
  4. You won't have any repositories yet - that's okay, we'll create on now! At the top of the screen you'll see a little plus sign next to the word "add". Click that. You should see a screen like this:
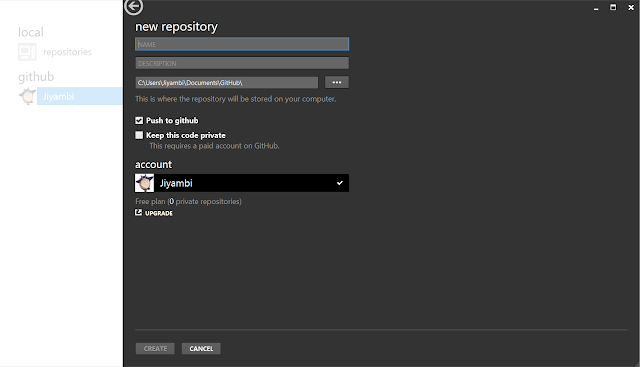
  5. Enter a name for your repository. I'll use "Tutorial" as the name for mine. When you name your projects in the future, make sure they are descriptive names so you and your collegues can easily find the repository you're looking for.
  6. Enter a description. This is also important as it's the first thing strangers or team mates might look at to learn more about your project. For my example I'll describe it as: "A simple repository for learning how to use github."
  7. You can change the location for the repository if you want to. I like to leave mine in the default folder, which is in the My Documents folder and a subfolder called GitHub. Where you keep yours is up to you as long as you can find it easily.
  8. Leave "push to github" selected. If you did want to only use the GitHub GUI to use git locally, you can uncheck this box. However, unless you are trying to keep your code secret, it's really better to use the remote repository since you get free project backups that way.
  9. For now, leave "keep this code private" unchecked. This means anyone will be able to see your code - in the future, you can get a paid subscription to github to create/convert to private repositories, or if you are feeling adventurous you can try other services such as Bitbucket which allow free private repos. For now, though, we'll just use a free public repository.
  10. Finally, click "Create" at the bottom!
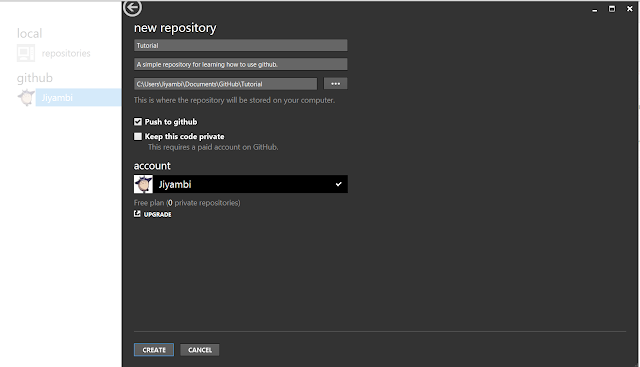
You've created your first repository! It will appear locally on your computer and also on github.com. Next we'll need to fill it up with something.

Making Commits and Syncing

You have a repository now, but it's empty. We'll create a simple text document to demonstrate making commits and syncing.

A commit is when you tell the program to take a snapshot of your project - somewhat like saving a new version. Generally you want to commit after each self-contained change is made. Fix a bug? Make a commit. Add a feature? Make a commit. Error on the side of smaller changes as opposed to massive amounts of differences between commits.

Syncing is when you upload your changes to the remote repository, or download changes from it - when you sync up your local and remote repositories. Always do this before and after you work on the project - before to make sure you have the most current code when you start, and after to make sure your work is uploaded and the remote repo is kept current. This is especially important when working in a group.

Now, on to how to do all that!
  1. Your new repository will now show up both in the local and github sections of the GitHub GUI. See my picture below for an example - I have a lot of extra repositories, but we'll focus on the one titled "Tutorial".
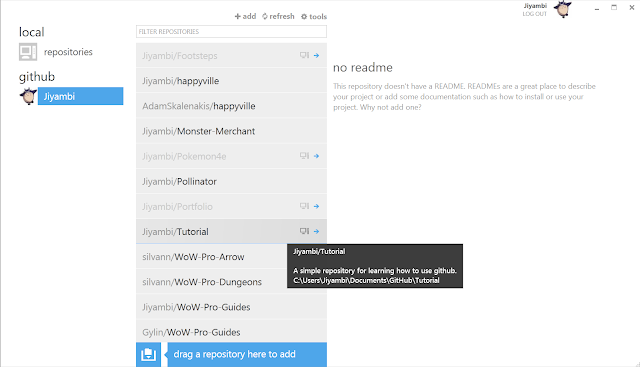
  2. You can right-click the repository to get a context menu with several import options. 
    • Open: This opens the repository in the GitHub GUI. We'll use this to make commits in a minute.
    • Clone and Clone to...: Use this option to clone a repository from github.com which you don't yet have a local copy for.
    • View on github: This will open a web browser to this repository's page on github.com. Useful if you want to use some of github's other features such as the wiki, issue tracker, or more advanced viewing systems and graphs.
    • Open in explorer: This opens a file browser to the repository's local location on your PC. We'll use this in a minute.
    • Open a shell here: For advanced users only. This allows you to use powershell to muck about with the repo at this location.
    • Stop tracking this repo: This will remove the repo from your list, generally you'll want to avoid this.
  3. You'll probably also notice that the text on the right-hand side is nagging you about adding a readme.txt for the repo. Doing this allows people browsing github to easily see what your project is all about. So lets get to that! Right-click the repo and choose "open in explorer". You should get a window that looks something like this, depending on whether you can view hidden files:
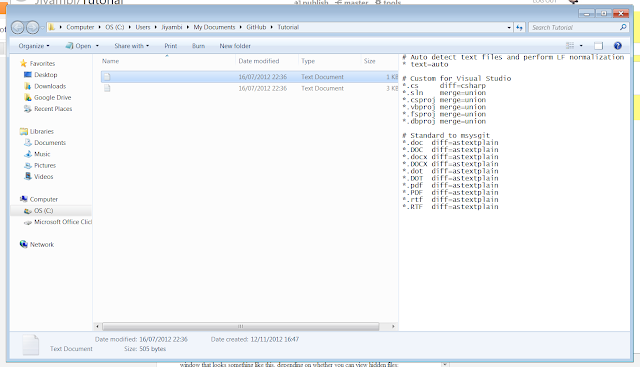
  4. What are those funny invisible files? Those are .gitattributes and .gitignore. They let you set up a few settings for the repository. However, they are a bit beyond the scope of this guide, so you can safely ignore them for now.
  5. Let's create a simple readme.txt to start us off. Create a new .txt document (you can right click the folder and select New -> Text Document). Name it readme.txt and put some text inside. Typically you want the readme to be a nice summary of your project, and you may want to include author names, copyright or license information, version details, and things like that.
  6. With your readme created in your repository's folder, click back over to your GitHub GUI window. You'll notice it's no longer nagging you about the readme and instead is displaying the text you typed in!
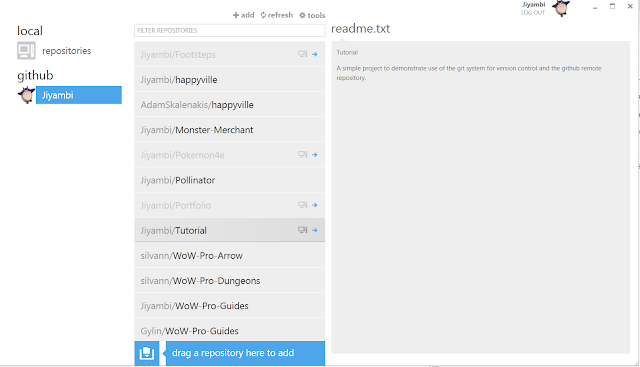


    Click the arrow next to the Tutorial repository listing (you can also right-click and select "open") to open the repository. You should see something like this:
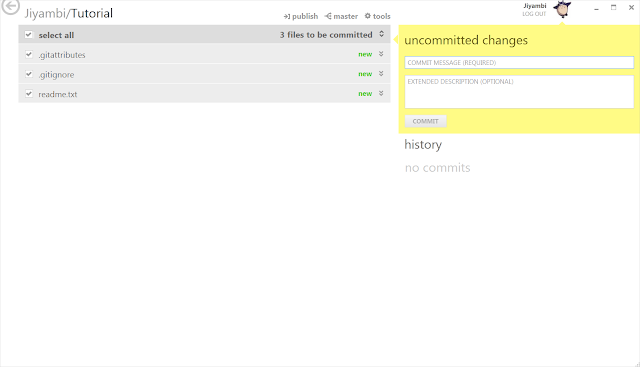
  7. This is the repository view. The files are listed on the left, with the history of the repository on the lower right, unsynced changed above that, and the current commit message at the top right. Right now we have only a few files, and no history or unsynced changes. You'll notice that there is a little "new" message next to our three files - the program is telling us that these files were not previously part of the repository. On the left of those files, you also see a check box. Generally you want to leave this checked - this tells the program that we want these changes to be part of our commit.
  8. Lets go ahead and make our first commit. Type in a commit message. Often with the first commit you just want something like "Initial commit" - but always try to make the message as descriptive but succinct as possible (a few words only). You can put more details in the extended description as needed. When you're done, hit "commit"!
  9. You'll notice the window has changed, it will now look something like this:
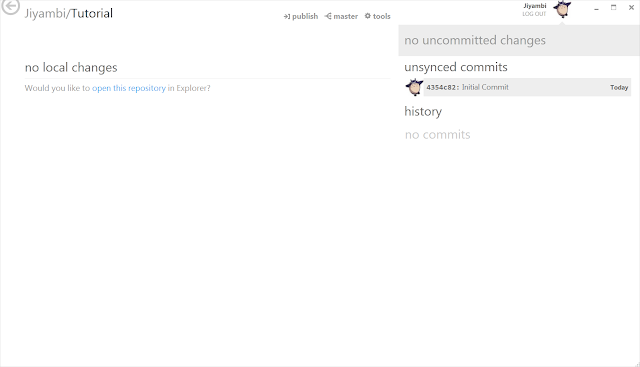


    Our files are no longer listed since there aren't any changes now. On the right, we now have an entry in "unsynced commits" - the commit you just made. If you select it, the left side will now show the changes that were made during that commit. This is very handy since you can go back and look at when certain changes were made. You can roll back to a previous commit using this interface by clicking one of the two buttons at the top - either "revert commit" to reverse the changes made by the commit, or "roll back to this commit", which reverts back to a state just after this commit was made. Both would be silly at the moment, but can be very useful for long-term projects.
  10. Let's go ahead and upload our change to the remote repository on github.com. This is very easy to do! Just click "publish" at the top of the window - normally this will say "sync" but since this is our very first commit for this repo, it will read "publish". It will take a moment to upload, then the "publish" command will change to "in sync", meaning your local repository matches the remote one. Always check for this when preparing to work, especially when working on a group project. You'll also notice your commit has moved from "unsynced commits" down to "history" - meaning it is now part of the github repository history.
  11. We've made our first commit and published our first repo to the remote repository! Let's make a quick change so you can see how the differences look. Open up the file browser again and edit the readme.txt in some way - add a few more lines of text (maybe an author section) and modify some of the existing text. Save your changes, and head back to the GitHub GUI window. You should see your changes represented on the left (you may need to click "show" on uncommitted changes at the top right):
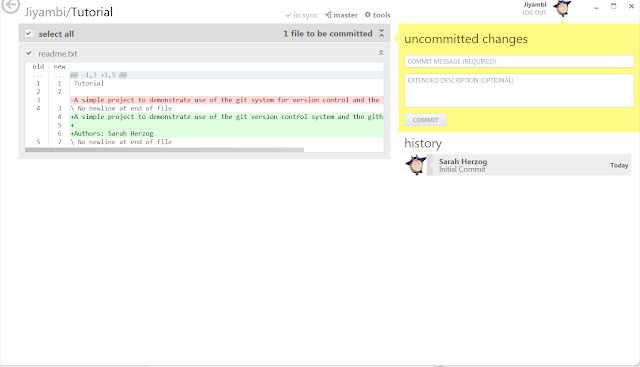


    As you can see, the changes are represented as lines added or lines deleted. If you change a line, it counts as deleting the old line and adding a new one. Git conveniently tracks line numbers as well, something most programmers should be familiar with.
  12. Go ahead and commit your change and sync it with the remote repo.
You now have created a repository, added files to it, published it, made changes, and submitted the changes! That in itself is pretty awesome, but that's not all git offers. Lets go to the website to see what other cool things we can do.

Github Repository Website

In addition to simply hosting your remote repositories, the github.com website has a lot of cool features. First of all, it makes coding a social experience by allowing you to browse other code with ease, and allows you to follow other coders. Your repository also has a built in wiki and issue tracking system, great for documentation and organizing ongoing work on the project. Last but not least, there are a lot of great ways to view your repository and statistics about your commits. Let's look at some of those now.

  1. Getting to your repository is very easy. The address is simply github.com/YourLoginName/RepoName. You can get there even easier if you already have the GitHub GUI open by right-clicking the repository listing and selecting "view on github", or by clicking the "github" text at the top of any commit. Once you get there, it should look something like this:
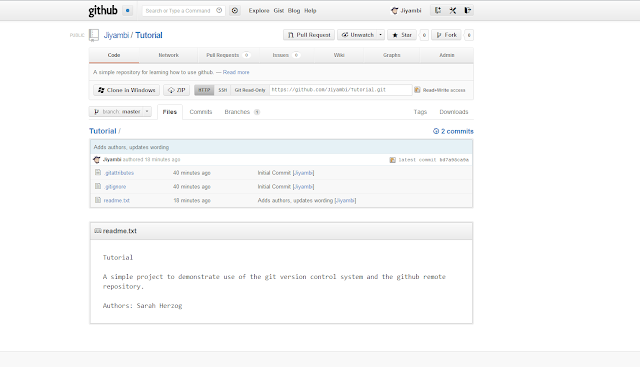
  2. From here, you can see your current commit and browse the files right in the web brower. For text files (most code falls into this category) you can actually see the file's contents, and there is syntax support for most common langauges. You can even directly edit files right in the web browser, great for quick fixes on the go.
  3. The Network section shows a nifty graph of all your commits to date. It's rather boring if you are working on a project alone, but it can be useful and much more interesting if you are working with a group of people, especially if they have separate forks. What is a fork you ask? Basically, someone can create a separate instance of your repository on their own github account, and work on it independently from you. Later, they can submit a pull request to you, and you can decide if you want to use their changes. This is a bit advanced, so don't worry about it too much to start with. Once you get comfortable with using version control, I do suggest reading a bit more about it and the other powerful features it has to offer.
  4. Pull Requests are again mostly useful for group projects. If someone forks your repository, they can submit a request for you to pull in changes they have made. This can be useful if you don't want to give someone collaborator rights to your repository, but still want them to be able to work on it. Many open source projects are handled in this fashion.
  5. Issues is a section for issue tracking. This is extremely useful, but the full features of this section are beyond the scope of this guide. Basically, you can create issues, categorize them, assign team members to them, add due dates, make notes on them, and add them to groups called "milestones". Obviously useful for bug tracking, the issue tracking system is also great for tasks during development.
  6. The Wiki section is great for documentation, such as a Game Design Document, or feature set planning. It supports most common wiki mark-up languages, including MediaWiki (what Wikipedia uses). Note: if you can't see the wiki, make sure you are logged in.
  7. The Graphs section contains a set of representations of your commit data. The usefulness of these varies, and for simple projects you will most likely ignore them.
  8. Admin is the section where you can change settings for your repository and it's github page. You can add collaborators here as well as change wiki and issue tracker settings. There are other options, but as a beginner those are the most important.
Now you know the basics and you're ready to start using GitHub for your own coding projects! Please do use version control copiously - it's so important to maintaining a good project and IS used in industry. It can save you a lot of time and heartache in the end, and the added bonus of easy access to your code from anywhere via github's website is really unbeatable.

Thursday, November 8, 2012

Github for your desktop?


I've used Git and Github for a long time, but up until today I've just used Git's Windows GUI. Syncing with Github, especially on a new computer, was always an exercise in frustration as I set up SSH keys, invariably messed up my cloning of my remote repo, and generally made a mess of things. I got a lot better after getting some experience with Linux, but for a "layperson" just getting into programming, Git and Github would be extremely inaccessible.

I'm very, VERY pleased to say this is no longer the case. Github now has a Windows application which makes this entire process trivial. Instead of faffing around with setting up SSH, going through a separate program to clone repositories, hunting for the proper address for the remote repo, and generally having a bad time, with the new app you simply log into Github and instantly have access to all your repos. You can clone them with a push of a button, see a lovely visual representation of all previous commits, and with another click go to the local location of the repo. New files show up instantly to be added, and you can commit and sync with github easily.

I can't rave about this app enough - it finally makes Git accessible for newbies on Windows. I sincerely hope this pushes Git forward as a version control method for Windows users.

Get your copy (for free, of course) here: http://windows.github.com/

Monday, November 5, 2012

Programming for Hire

I'm starting a new experience this week. My good friend Millie, who is doing a professional master's program at Abertay, is asking me for help with her project. I'll be doing some contract-style coding (though of course all on a volunteer basis). Up until now I've either worked in teams with evenly shared control and responsibility, or on my own. This will be the first time I've worked on "someone else's project" so to say.

I am actually quite excited. I've never been an "idea person", but I'm pretty good at executing other people's ideas. I'm hoping this will give me some good experience working with a team, as well - I've very seldom done team programming, so this will be a great start. It will also give me a chance to brush up on my C++, as well as the library we are using, Allegro. More on that in another article.

As I continue doing work for Millie I'll report back with my results. I'm looking forward to what should be a rewarding and educational experience!

Sunday, November 4, 2012

Github vs. Bitbucket, Part 1

In the past, I've always used Github for my online repository needs. It has a wiki and issue tracking system for each repository  as well as a very nice layout of the files in the repository, syntax highlighting  and the ability to edit files from the website. In addition, it's got some very nice graphical representation of commits and contributions from individual users. The main drawback? Private repositories cost money.

However, I was recently recommended Bitbucket, a similar online repository website which allows free private repositories. I've decided to take a look at it, and so far I've been pretty impressed. It shares the features of a wiki and issue tracking system, which is a big plus as I like to keep my game design document online in the wiki along with the code. I haven't uploaded a repository yet, but I'm hopeful it will have similar features to Github. The fancy graphs may be missing, but how useful were they anyways?

I'll be using Bitbucket for one of my personal projects. We'll see how useful it is in practice, and I will report back with a full comparison of the two services for your viewing pleasure.

Saturday, November 3, 2012

Day of the Nerd: Learning RPG Maker

We live in a world increasingly full of useful tools that make game development accessible to everyone, even those without programming experience. I'm a member of the Game Development Society at my university, and my group (calling ourselves Day of the Nerd) has decided that our team will be using RPG Maker to create a game in our spare time. Normally I wouldn't bother learning a tool like RPG Maker, and would be focusing on more technical mediums such as C++ or at least C# or Java. However, since this is going to be more of a fun project in our free time, I think it will be nice to use a tool that makes the process much easier, while possibly sacrificing customization power and run-time efficiency.

My role in the group will be programmer. Specifically, I will be learning the scripting system of RPG Maker. It uses Ruby, a scripting language I've not had any experience with previously, so it will be a chance to learn both a new technology and a new language on top of that.

I've also noticed my team-mates don't have much experience with game design documents (GDDs) or with version control tools. I'm hoping to help them learn about these useful subjects so we can use them in our project.

Overall I'm cautiously optimistic that the process will be a good learning experience, and help add another item to my portfolio.

You can learn more about RPG Maker on their website: http://www.rpgmakerweb.com/

They have free 30-day trial versions of all of their RPG Maker products, and several versions of the program to cater to different development needs - some as cheap as $30.

I'll be using tutorials from all over the internet, but I've found some useful ones here: http://rmxp.tigerseye.uk.com/

They are well written, easy to follow, but a bit simple. I'm hoping to find some more advanced scripting tutorials, and will share those when I try them out.

Friday, November 2, 2012

AI Planning

AI is one of the most important facets of a game. It not only provides interesting and challenging gameplay, but is also vital to a player's immersion. Choosing the right AI method to use is a very important decision, and one which depends heavily on the circumstances of the game and the development company.

There are many types of AI to choose from, but today we'll look at three different AI decision making methods - finite state machines, GOAP (Goal-Oriented Action Planning), and behavior trees. We'll use a simple problem that the AI entity must solve, to compare these methods:

“An NPC is standing on the bank of a river, and he wants to get to the  other side. He can walk, swim, and sail. Walking is the most  preferable, but can only happen if there is a bridge. Sailing is the  second most preferable, but can only happen if there is a boat.  Swimming is the last resort.” 

Finite State Machine

In a finite state machine, the different behaviors the entity can exhibit are sectioned off into states, which are connected by transitions, often accompanied by some condition. 


In this case, I represented the different conditions (bridge, no bridge, no boat) as separate states to keep the diagram from looking so cluttered with transitions, but this probably would more accurately have been represented as one state (where the behavior was standing on the river bank) with multiple transitions, each with their own conditions (bridge, no bridge but boat, no boat or bridge).

The advantage of a finite state machine is that it is fairly simple to understand and implement, and that you can represent pretty much any behavior in this fashion. The disadvantage is that the programmer must explicitly define all behavior and transitions/conditions manually, which can require a lot of time. Additionally, when representing vast complex actions, the FSM can become convoluted and difficult to follow.

GOAP

GOAP sacrifices run-time speed for development speed, placing the burden on the entity to make decisions based on action weighting and constraints. A GOAP representation of a problem consists of a goal, an initial state, and a set of actions the entity can choose from to reach the goal from the initial state. Each action must have a weighting, an effect, and a precondition.


GOAP can either build toward the goal from the initial state, or build backwards from the goal state towards the initial state. Both methods use a state space search method to build an optimal solution. In this case, we have a post condition where we've crossed the bridge. The GOAP system then Finds an action from it's database of possible actions which has an effect matching the end goal. Next, it checks if the precondition for this action is satisfied by the initial condition. If so, it has a possible solution, if not, it continues selecting actions matching the current state (effect) until it reaches the initial condition - though if no actions can reach the initial condition, it abandons the possible solution. Once it has a possible solution, it checks the value of the solution by adding up the weight of all the actions. It keeps doing this until it finds the lowest value solution, using a heuristic to perform a state space search. 

As you can imagine, this takes a lot of processing power, especially if there are many actions available. The trade off is that it makes the workload on the programmer much less, since he or she needs only code in possible actions for an entity, and the entity creates it's own solution for each particular problem. Compare this with creating a finite state machine for every possible problem, and you can see how it is easier on the programmer. For projects with limited programmer resources (time or number of programmers), this can be a great choice.

Behavior Trees

Behavior trees (actually directed acyclic graphs or DAGs) represent a breakdown of a task into smaller tasks. These break down until you reach the leaves of the tree, which represent the interface between the AI logic and the engine. These include conditions and actions. A task will continue to run it's action as long as it's condition is true, or until the action is complete. Parent tasks choose which child tasks can be run. This can be done in sequence, or by selection based on conditions. In a sequence, the parent task deals with the success of a child task by moving on to the next task in the sequence. For a selector, it tries to execute a child task and deals with failures by moving onto the next. Essentially, sequence moves on success while selector moves on failure.


In this example, the main task is to cross the river. Since there are several ways to do this, and not a sequence of ways, this will be a selector type task. It will try child tasks from left to right, so higher priority tasks go on the left. First it will try to walk over the bridge. If there is a bridge, this task will carry out until either it completes (success) or until there stops being a bridge (failure). As you can see, this allows for a change of action in the middle of the task, if for example the bridge is destroyed. A success of any of the tasks causes the parent to stop trying other child tasks, and return success to it's parent. Failure of all child classes will cause a return of failure to the parent - the bridge cannot be crossed in that case. However in our example, that won't happen, since the final child task (swim) has no conditions - it is always possible.

The tasks used for behavior trees have the advantage of being re-useable. They have the advantage of being more efficient during run-time, but they do take longer to create than a simple database of actions as in GOAP. However, it has been proposed to combine these two methods, using planning to dynamically build behaviour trees out of a database of tasks. This would allow programmers to explicitly define behaviour trees when it makes sense to do so, saving run time resources, but to build them dynamically when necessary.

Conclusion

No single AI method will be ideal for every game and every dev team. As with most development choices, it depends entirely on the circumstances. However, by combining AI techniques, smart programmers can get the best of both development and run-time efficiency.

Thursday, November 1, 2012

State of the Blog

Hello readers!

I've let my blog stagnate quite a bit of late. With my move to Scotland, starting my course, and meeting all sorts of new people, this is understandable. However, I've let my drive for professional development lapse as well, and that's not something I want to happen. Because of this, I've decided to try and post something every day here on the blog. The posts may be short, but they will happen!

Due to my coursework, I'll have a lot of interesting topics to cover. I've been reading a LOT of industry news lately, so I'll almost certainly be covering some topics in gaming news. Additionally, I'm taking a class about gaming AI, and have to write one blog post a week for that class, so I will most likely post that here as well. I am also working on three major gaming projects, and will provide update and insight into my development progress here as well. Finally, I will occasionally have personal posts, mostly relating to my exploration of the beautiful country of Scotland.

I hope I can provide some interesting content for readers of this blog. But, more importantly to me, I hope this commitment to gaming industry related content will help keep me developing professionally outside what is required in my course. Wish me luck!